Tent Camping in the Rain Hacks: Stay Dry & Enjoy Every Drop
Rain doesn’t have to ruin your camping adventure. I’ve spent plenty of nights cozied up in a tent, listening to raindrops drumming on the roof, and honestly, those “imperfect” weather days sometimes end up being the most memorable.
The real trick to enjoying tent camping in the rain? It’s all about prepping well, picking the right gear, and nailing your setup so you stay dry and comfortable.
After years of soggy mistakes and plenty of “learning opportunities,” I’ve come to love camping in wet weather. There’s something pretty magical about feeling warm and dry while rain patters overhead.
It all comes down to where you pitch your tent, how you rig up your rain shelters, and which gear actually holds up when the skies open up.
I’m excited to share my favorite rain camping hacks that have turned what could’ve been miserable trips into some of my best outdoor memories. From setting up tarps like a pro to keeping your socks bone-dry, these are the tricks that help you embrace rainy weather instead of dreading it.
You’ll pick up tips for choosing the right campsite, building reliable shelters, cooking up tasty meals under cover, and even keeping yourself entertained when you’re tent-bound for hours.
Key Takeaways
Pick campsites on higher ground with good drainage, and set up multiple tarps to create dry hangout zones.
Invest in quality waterproof gear and use smart tent setup techniques like a snug rainfly and well-placed guy lines.
Stash essentials in waterproof containers, whip up simple meals under shelter, and bring something fun to pass the time if you’re stuck inside.
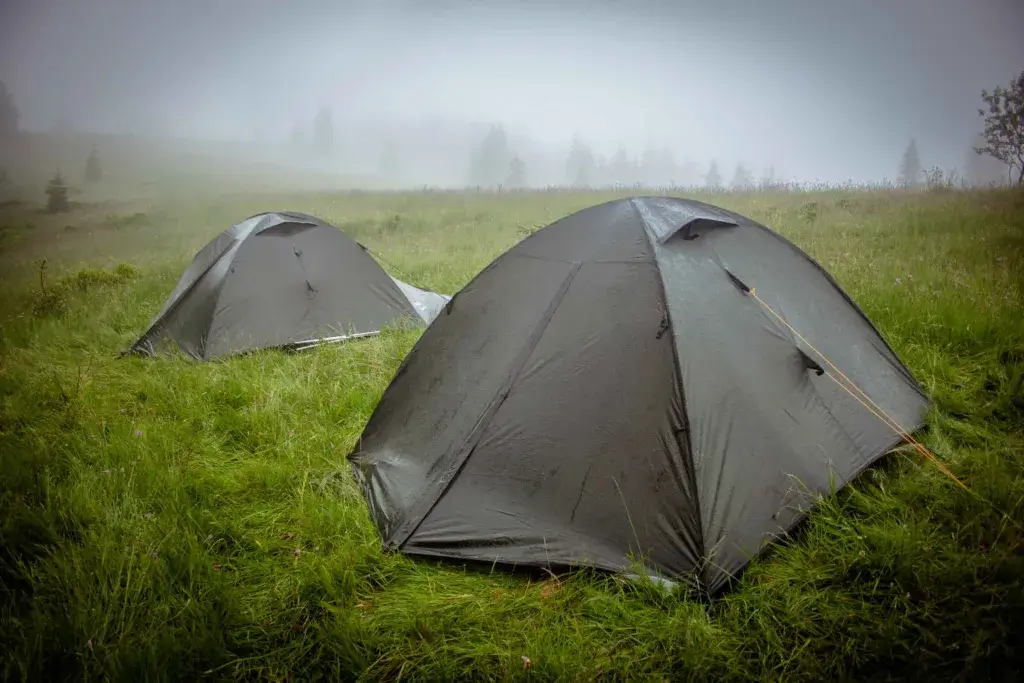
Choosing the Perfect Campsite for Rainy Weather
Your campsite location can make or break your rainy trip. A smart spot keeps you dry, saves your gear, and lets you actually enjoy your wet-weather camping experience, even when the weather isn’t playing nice.
Selecting Elevated Ground and Safe Spots
On my first rain camping trip in Oregon, I set up in what looked like a perfect flat spot. At 3 AM, I woke up floating in a puddle.
Always aim for higher ground when rain’s in the forecast. Even a few feet of elevation can keep your tent above the flood zone. Water’s going to flow downhill, so find a spot that sheds water away from your shelter.
Ridge lines and gentle slopes have become my go-to. I usually walk around and picture where water would run if it started pouring.
Skip the valleys and dips, no matter how sheltered they look. Those spots become puddle magnets in a downpour. I’ve watched entire campsites turn into lakes after an hour of steady rain.
Test your spot with a water bottle. Pour a little water and see where it goes. If it pools where you plan to sleep, trust me – move.
Avoiding Natural Runoff and Flood-Prone Areas
Stream beds and dry creeks can fool you. They look perfect on sunny days, but during rain, they’re downright dangerous. I once saw a “dry” wash become a rushing river in half an hour.
Stay at least 200 feet back from any water source – streams, lakes, rivers, you name it. Even a trickle can turn wild fast when storms roll through.
Here are some red flags when you’re scouting campsites:
- Debris lines caught in trees or bushes
- Smooth, worn rocks (a sign water flows here often)
- Sand or silt deposits in odd places
- Bent or damaged plants pointing downhill
Drainage channels aren’t always obvious. I’ve learned to spot subtle dips and grooves that channel water during storms. Sometimes they’re just a few inches lower than the rest of the ground.
Rocky spots usually drain better than soft soil. Water runs off rocks quickly instead of pooling around your tent.
Setting Up Away from Trees and Overhanging Branches
Trees seem like the obvious rain shelter, right? I used to think so, until I spent a night under a thick canopy – drip, drip, drip, all night long.
Trees collect and dump water from their leaves and branches. Even after the rain stops, you’ll get soaked by lingering drips. The ground underneath stays soggy for hours.
Dead branches are another risk. Wind and rain can send them crashing down without warning. I always scan overhead for any sketchy limbs before pitching my tent.
Pine and fir trees are especially sneaky; those needles hold water forever. Deciduous trees with broad leaves aren’t much better. Both create concentrated drip zones.
My favorite rain camping spots have open sky above and some natural windbreaks around the sides. Scattered bushes or rocks work great, dense forest, not so much.
Give yourself at least 30 feet of clearance from big trees. That keeps you out of the “drip zone” and away from potential falling branches.
Tarp Mastery: Creating Reliable Rain Shelters
A good tarp shelter can turn a soggy night into a cozy retreat. Nailing the basics – setup, smart placement, and creative uses – makes all the difference.
Tarp Shelter Setups and Rigging Techniques
The A-frame setup is my go-to tarp shelter for rain. It’s simple, but it works.
Find two sturdy trees about 10-12 feet apart. Run your paracord between them at chest height, make it tight, like a guitar string.
Drape your tarp over the ridgeline and center it. Pull both sides down at about 45 degrees and stake them out. You get a peaked roof that sheds water beautifully.
For windy nights, I add guy lines to the middle of each side. When the wind howls at 2 AM, you’ll be glad you did.
The lean-to design is great for a quick shelter. Anchor one edge high between trees, let the other touch the ground, and angle it away from the wind.
If trees are scarce, the diamond pitch comes in handy. Use adjustable poles for a center point, then stake out all four corners. This wind-resistant setup can handle a surprising amount of weather.
Choosing the Best Spot for Your Tarp Shelter
Location matters just as much with tarps as with tents. I’ve made the mistake of setting up in a low spot and waking up in a puddle – not fun.
Look for ground that’s a little higher than the surroundings and drains well. Skip the dips where water collects.
Always check above for dead branches or loose bark. I like to think Mother Nature’s got a sense of humor, but I’d rather not be the punchline.
Face your shelter opening away from the wind. In most places, that means southeast or east, so you catch the morning sun and block the worst weather.
Natural windbreaks – big rocks, thick brush – are lifesavers. They add protection without any extra gear.
Set up tarps at least 200 feet from water sources. It keeps things legal and helps with condensation, too.
Essential Uses for Tarps Around Camp
Beyond shelter, tarps become your Swiss Army knife for camp comfort. I use mine to create covered cooking areas that keep my stove dry and meals warm.
A simple lean-to over your camp kitchen transforms rainy meal prep from a soggy chore into a pleasant experience. Just angle it to direct smoke away from your main shelter.
Ground tarps under your tent create an extra moisture barrier. They also protect your tent floor from sharp rocks and rough terrain that could cause expensive damage.
When storms hit, I string up rain shelter configurations to create dry zones for hanging wet gear. Nothing beats having a covered space to organize equipment without everything getting soaked.
- Use as emergency signaling device
- Create privacy screens around camp
- Collect rainwater for cleaning
- Protect firewood from moisture
The beauty of tarp camping lies in its versatility. With some paracord and creativity, you can adapt to almost any weather condition nature throws your way.
Layering with Waterproof Clothing
My layering system always starts with moisture-wicking base layers. Merino wool is my favorite because it keeps me warm even if it gets a little damp.
The middle layer gives you insulation. I reach for synthetic materials in wet weather since down just turns useless when wet and takes forever to dry out.
Your outer shell, the waterproof clothing layer, should fit loosely enough to let air circulate. If it’s too tight, you’ll overheat in no time.
Temperature regulation sneaks up on you. I’ve watched people strip down to base layers in chilly rain because they overheated on a tough hike.
Plan for how much you’ll move around. Remove layers before you feel sweaty, and add them back before you start to shiver.
This simple habit has saved me from some truly miserable nights. Honestly, it’s the little things that make all the difference.
Backup clothing in dry bags is my security blanket. I never skip packing extra socks and a dry shirt; they’ve rescued my mood more than once.
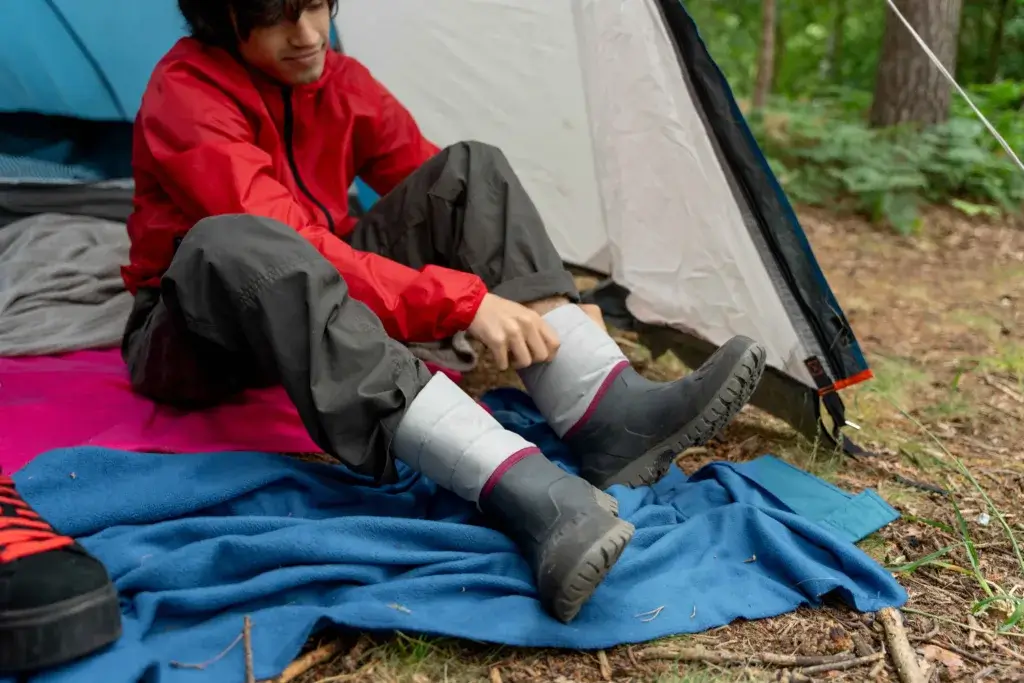
Footwear for Wet Conditions
Waterproof boots changed my whole approach to camping. Dry feet keep my entire body happier and warmer.
Full rubber boots are a lifesaver in mud. They’re easy to rinse off and totally waterproof, so I just slip them on over my hiking socks for camp chores.
Rain boots should be a size up from your regular pair. That extra space lets you wear thick socks and helps prevent blisters – your feet will thank you.
Gaiters are a must for me now. They shield your legs and block water from sneaking into your boots on soggy trails.
Waterproof socks make a good backup. They’re not the comfiest for long hikes, but they’re perfect for quick runs outside your tent.
Always stash extra socks in waterproof bags. Dry feet do more for morale than just about anything else when the rain won’t quit.
Tent Setup Hacks to Stay Dry
Getting your tent set up right is the difference between a cozy night and waking up in a puddle. I’ve found that waterproofing your tent and picking the right spot matter way more than you’d think when the weather goes south.
Using Tent Footprints and Ground Tarps
One time, I skipped the footprint and woke up in a puddle – never again. Protecting your tent floor with a tarp is worth the extra weight every time.
A tent footprint acts as a shield between your tent and the soggy ground. It stops water from seeping up and protects against rocks or sticks that could poke holes in your floor.
You don’t need a fancy footprint either. I use a heavy-duty tarp cut just a bit smaller than my tent’s base.
Make sure it doesn’t stick out past your tent walls. If it does, it’ll just collect rain and funnel it right under you, which is the last thing you want!
I always toss in a couple of garbage bags, too. They’re great for emergency ground cover and weigh next to nothing.
Pitching Your Tent for Maximum Rain Protection
Location is everything. I hunt for slightly higher ground that’s well away from rivers or lakes. Nobody wants to wake up floating, right?
Here’s my rainy-day tent setup routine:
- Set up the rainfly first – Get that cover up before anything else
- Pitch the inner tent under the fly – Stay dry while you work
- Make sure guy lines are tight – Loose lines mean water pools and a saggy tent
- Point the door away from the wind – Keeps rain from blowing in every time you open up
I’ve dug a little moat around my tent during downpours, and yes, it looks silly, but it channels the water away and keeps my sleeping bag dry.
When the ground turns to soup, my tent stakes just don’t hold. I use rocks for “deadman” anchors, tie your guy line around a rock, and bury it in the mud. Works like a charm.
Managing Condensation and Ventilation
Even with a perfect setup, condensation can make you miserable. I’ve woken up thinking my tent leaked, only to realize it was just my own breath fogging things up.
Ventilation is your best friend. I always crack the vents, even if it’s raining lightly. Most modern tents have vents designed to keep you dry but let the air flow.
I keep a microfiber towel handy to wipe down the walls. You’d be surprised how much water builds up overnight, especially when you’re breathing in a closed tent.
Here’s my anti-condensation checklist:
- Change into dry clothes before bed
- Keep wet gear in the vestibule
- Use tent vents, even in drizzle
- Wipe down walls with a towel
If the rain isn’t pounding, I’ll crack a window or door just a bit. That fresh air makes a bigger difference than you’d think.
Keeping Gear and Essentials Dry
Staying organized is the real secret to dry gear. The right containers protect your essentials, and smart camp zones stop wet stuff from spreading misery to everything else.
Packing with Waterproof Containers and Bags
I learned the hard way that not all “waterproof” gear lives up to the label. My first rainy trip, my so-called waterproof bag leaked all over my spare clothes and phone – lesson learned.
Now, I’m loyal to dry bags for anything that matters. I mix and match sizes: small for my phone and waterproof matches, medium for clothes and sleeping gear.
Clear waterproof containers are perfect for food and cooking gear. I can spot what I need without opening everything in a downpour. Plus, hard cases keep fragile stuff safe if things get tossed around.
Here’s how I pack:
- Electronics bag: Phone, camera, charger
- Clothes bag: One totally dry outfit for each person
- Fire supplies: Matches, lighter, dry tinder
- Medical kit: First aid in a sealed box
I double-bag my phone and anything I can’t afford to lose. It takes seconds and has saved my sanity more than once.
For sleeping gear, my bivy bag lives in its own waterproof sack. Even inside the tent, that extra layer keeps my bag bone-dry.
Organizing Wet and Dry Zones at Camp
Setting up clear wet and dry zones changed how I camp in the rain. Now, I keep moisture from creeping into my clean, dry gear.
My wet zone sits right outside the tent, under a tarp. That’s where muddy boots come off, rain jackets hang, and dripping gear stays put. I lay down a small tarp to mark the space.
The dry zone is sacred, inside the tent or under a separate shelter. Only dry stuff crosses that line. I don’t bend on this rule, even for “just a little damp” gear.
Inside the tent, I break things up further:
- Sleeping area: Only dry clothes and bedding allowed
- Gear corner: Waterproof bags and bins
- Vestibule: The in-between spot for peeling off wet layers
I stash a towel at the tent door to wipe down gear before it comes in. This tiny habit keeps the dry zone from turning into a swamp.
Pro tip: I hang a small mesh bag from the tent ceiling for quick-grab stuff. My phone, headlamp, and snacks stay handy but off the possibly damp floor.
Campfire and Cooking Hacks When It’s Wet
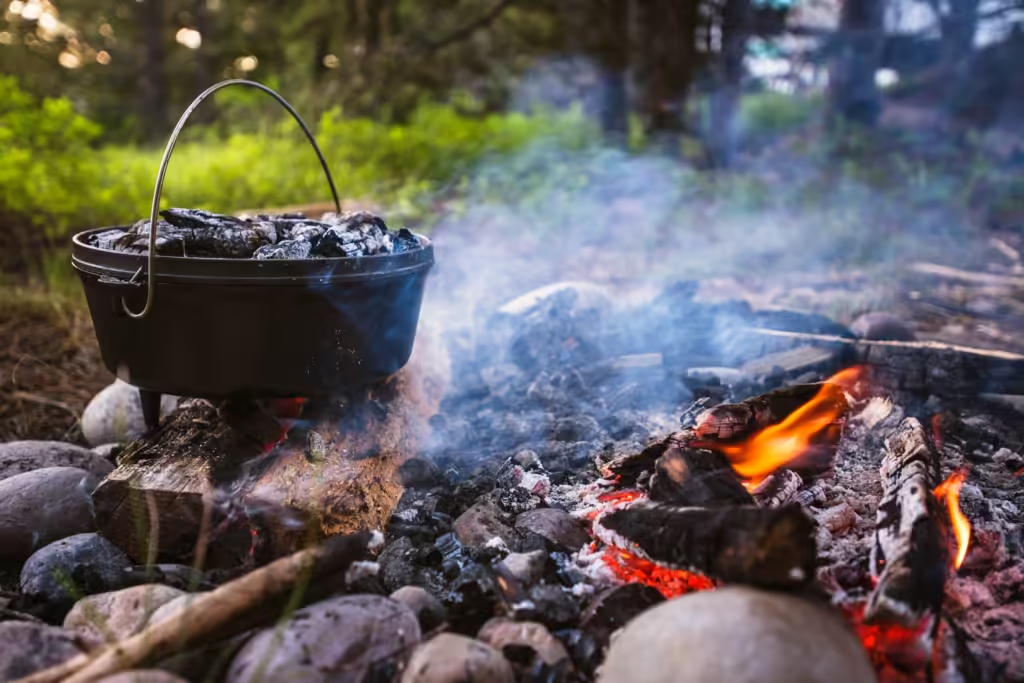
Lighting a fire in the rain takes some sneaky tricks. The right kindling and waterproof fire gear make all the difference. Cooking in wet weather means getting creative with your setup and tools if you want hot food and dry socks.
Fire Starting with Wet Wood and Waterproof Matches
I always keep waterproof matches in my rain jacket pocket. Regular matches turn useless the second they get damp. But here’s the catch: even waterproof matches need dry tinder to work their magic.
My favorite hack is packing dryer lint in a tiny waterproof container. It lights up instantly and burns long enough to coax even wet kindling to life. I bring a little tube of petroleum jelly too, cotton balls coated in it burn for ages, even in drizzle.
Building a fire foundation is everything. I make a platform out of chunky logs or rocks to lift the fire above the wet ground. That way, moisture doesn’t sneak up and snuff out my flames.
When wood is soaked, I split it open to find the dry core. The outside might be soggy, but the inside usually lights up if you give it a chance.
Choosing and Storing the Right Kindling
I learned this the hard way on a drenched trip in Oregon, not all kindling works in the rain. The right stuff, packed the right way, can save your whole meal plan.
Birch bark is my go-to natural fire starter. Its oils let it burn even when wet. I always grab a few strips if I see a birch tree and tuck them into a dry bag.
My kindling stash lives in three ziplocks:
- Fine tinder (dryer lint, petroleum jelly cotton balls)
- Medium kindling (pencil-thin dry twigs)
- Finger-thick kindling (thumb-sized sticks)
I slide these into my pack’s rain cover pocket. Pine needles are another favorite; their resin helps them catch fast.
Fat wood from pine stumps is a total game-changer in wet weather. I always grab a chunk if I spot an old pine stump – those things are loaded with flammable resin and burn like crazy.
Cooking Tips Under Rainy Skies
Positioning your camp kitchen before the rain even starts makes everything easier. I always look for big rocks or dense trees as natural windbreaks as soon as I get to camp.
My rain cooking setup? It’s usually a small tarp stretched between trees or hiking poles. That gives me a dry spot over my camp stove, and I make sure to angle it so the water runs off somewhere else.
I never cook inside my tent; carbon monoxide is no joke. If the weather gets really wild, I’ll use my tent’s vestibule with both ends wide open for airflow, but only as a last resort.
Here’s my wet weather cooking checklist:
- Liquid fuel stove (works better than canister stoves in cold, wet conditions)
- Windscreen around the stove
- Lighter in my jacket pocket (faster than matches)
- Pre-portioned meals in ziplock bags
I prep ingredients at home and pack them in waterproof containers. Less fumbling with soggy packaging means more time enjoying hot food under the tarp.
Staying Warm, Comfortable, and Entertained
Staying cozy on a rainy camping trip is all about smart layers and having a few heat tricks up your sleeve. Hand warmers are a must, and so is a plan for drying gear and setting up a comfy hangout spot.
Using Hand Warmers and Layering for Warmth
I learned the hard way that cotton is a disaster when it’s wet and cold. My first rainy camping trip? I froze all night in a soggy cotton hoodie and swore I’d never make that mistake again.
Now, I stick to synthetic materials and merino wool for base layers. Hand warmers are lifesavers when the temperature drops. I keep a mix in my kit:
- Disposable air-activated warmers—these last 8-10 hours
- Rechargeable battery warmers—eco-friendly and reusable
- Catalytic hand warmers—use lighter fluid, burn hot for 12+ hours
My layering system starts with moisture-wicking base layers, then a fleece or down jacket. The outer shell? Waterproof but still breathable, no exceptions.
I always carry extra socks in waterproof bags. Bringing multiple pairs of dry socks is the only way to avoid that soggy-foot misery that can ruin your day.
For bedtime, I toss hand warmers into my sleeping bag about 30 minutes before crawling in. Feels like magic.
Drying Out Wet Clothes and Gear
Putting on damp clothes in the morning is the worst. I found that staying dry from the start is the real secret to comfort in the rain.
My drying station? Just some rope or paracord between trees, with wet stuff hanging under the tarp or in the tent vestibule. Never dry clothes inside your sleeping area; that just turns your tent into a steamy mess.
Here’s my gear drying priority list:
- Socks and underwear—they always get first dibs
- Base layers—critical for warmth
- Outer shells—these take the longest
- Boots—if you have newspaper, stuff it in
I use a small camp towel to blot off as much water as possible before hanging things up. For boots, I pull out the insoles and laces to help them dry faster.
Battery-powered fans are a game-changer for air circulation. I aim mine at the drying line under my tarp and let it do its thing.
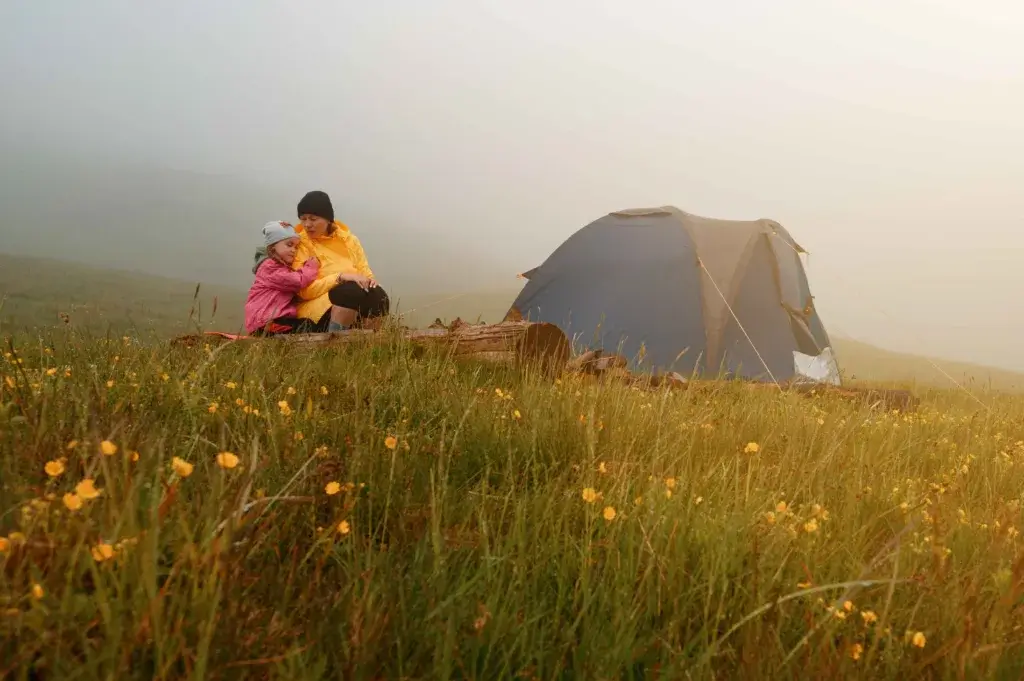
Creating Cozy Common Areas with Camp Chairs
Camp chairs can turn a miserable, wet campsite into a surprisingly comfy lounge. I learned this after three straight days of rain in the Smokies – our group basically lived in those chairs under a big tarp.
First, I lay down a waterproof groundsheet. Then, I arrange the chairs in a circle or facing each other, keeping everything off the wet ground as much as possible.
My go-to rainy day setup includes:
- Comfy camp chairs with cup holders (non-negotiable)
- Waterproof playing cards—you can play for hours
- Portable speakers for music (just keep them in a waterproof case)
- Camp table for snacks and drinks
Playing in the rain can be a blast if you just lean into it. Some of my favorite camping stories happened while we sat in camp chairs, swapping tales with rain drumming on the tarp.
I like to string up battery-powered LED lights around the area for extra coziness. It turns the whole scene into a glowing little oasis, and honestly, you almost forget it’s pouring outside.
Frequently Asked Questions
Here are the questions I hear most about camping in the rain. I learned these lessons through plenty of soggy mistakes and a few accidental successes.
What are some ingenious ways to keep a tent dry during unexpected rainfall?
I always pitch my tent on high ground to avoid waking up in a puddle. That simple move has saved me more times than I can count.
Before every trip, I check the tent seams and hit them with seam sealer if they look worn. My old Coleman needed this every season, but it kept me dry through some wild storms.
I angle tarps above my tent, making sure the tarp never touches the tent roof. If it touches, water just wicks right through – ask me how I know!
Rain flies are absolute lifesavers. I bring mine even if the forecast calls for sunshine. Mountain weather is unpredictable.
When I use a ground tarp, I tuck it completely under the tent floor. Any edges sticking out just funnel water right underneath you – no thanks.
Could you share tips on setting up a tent in the rain to avoid getting everything soaked?
If it’s raining when I arrive, I put up a tarp shelter first. That gives me a dry spot to set up the tent without everything getting drenched.
Pop-up tents are my secret weapon for surprise downpours. They go up in minutes, so I’m not standing in the rain wrestling with poles.
I keep the tent floor dry by laying out the footprint and tent body at the same time. That way, rain doesn’t pool on the floor while I’m setting up.
All my gear stays in waterproof bags until the tent’s ready. I learned the hard way that a wet sleeping bag is a total mood killer.
What are the best activities to make a rainy day of camping fun for the whole family?
Story time is pure magic when rain taps on the tent roof. I bring a couple of favorite books and set up reading nooks with sleeping bags and pillows.
Simple games that don’t need much space are gold. “Would you rather” and twenty questions can keep us laughing for hours when the weather turns rough.
After the rain, worm collecting becomes a full-blown adventure. Kids love hunting for the biggest earthworm, and honestly, it’s pretty fun for grown-ups too.
Puddle jumping is a must. I make sure everyone has boots, and then we splash around like it’s our job.
I bring a stash of craft supplies for tent time, coloring books, tiny puzzles, and travel games to keep everyone happy while we wait out the storm.
How do you effectively manage camping with kids when the weather turns rainy?
Good rain gear is everything when kids are involved. I invest in solid rain suits so they can play and explore without getting miserable.
Extra clothes packed in waterproof bags are essential. Kids have a talent for getting soaked, so backup outfits save the day.
Planning indoor activities ahead of time keeps everyone sane. I pack special treats and games that only come out when it’s raining.
Screen shelters become our living room if the rain sticks around. We eat, play, and hang out together while still feeling outdoorsy.
I try to keep my attitude upbeat because kids pick up on our energy. If I’m having fun, they usually are too, even if we’re all a little soggy.
Are there any foolproof methods for packing up a wet tent without making a mess?
I never try to force a wet tent back into its original bag. Instead, I roll it up in old moving blankets or big garbage bags that I can wash later.
Rolling the tent loosely helps protect the fabric. Jamming wet material into a tiny stuff sack is a recipe for tears and creases.
When I get home, I set up the wet tent right away. Drying it out completely before storage keeps mold and mildew at bay.
Plastic bags are my best friend for separating wet gear from everything else. I always bring a few big ones just for pack-up day.
I flip the tent over to dry both sides. The bottom usually stays wetter, so I give it extra time before packing away for good.
What are some must-have items to include in your pack to stay comfortable when tent camping in wet weather?
Dry bags are worth their weight in gold for protecting electronics and spare clothes. I always toss my sleeping bag and extra layers in these trusty waterproof sacks; nothing ruins a trip faster than soggy socks at bedtime.
I never forget to bring a handful of extra garbage bags. They’re surprisingly handy for organizing wet gear, whipping up a makeshift poncho, or just keeping muddy boots from wrecking the inside of your tent.
If you haven’t tried quick-dry clothing yet, you’re missing out. Synthetic shirts and pants dry fast and feel way better than clammy cotton, which I avoid like the plague on wet trips.
A solid rain jacket and pants are non-negotiable for me. After one too many soaked afternoons with cheap gear, I learned that cutting corners here just isn’t worth it.
I stash waterproof matches or a reliable lighter in a couple different spots in my pack. Fire-starting in the rain can be a real pain, so I always want a backup plan or two.
Extra tarps have saved my bacon more times than I can count. I lay them down as ground covers, drape them over gear, or rig up extra shelter when the rain just won’t quit.