DIY Vertical Storage Projects for Small Campers: Clever Ways to Maximize Your Tiny Home on Wheels
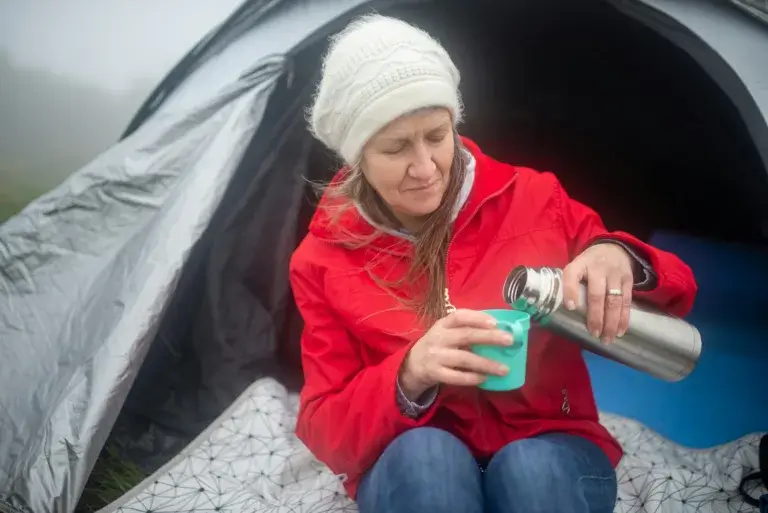
Living in a small camper? Tight spaces are just part of the deal. If you’ve ever tried cramming gear, clothes, kitchen stuff, and outdoor equipment into a few square feet, you know the struggle.
The good news: your camper’s walls and vertical spots are basically blank canvases for storage. There’s a lot of unused space just waiting to help you out.
This guide brings you 20 practical DIY vertical storage projects that make the most of your camper’s wall space. You’ll find everything from simple wall-mounted shelves to clever hanging hacks, and there’s something here for every skill level and budget.
Most of these projects use basic supplies – think wood crates, pegboards, hooks, and baskets – to turn wasted space into organized storage. You don’t need to be a pro builder, either.
Many of these ideas just require simple tools and stuff you probably already have or can grab at a hardware store. Ready to clear your floor and actually find your stuff? Let’s dive in.
1) Install vertical wire baskets on walls for easy shoe and accessory storage.
Small campers fill up fast, especially when shoes and daily gear start piling up. We don’t have space for clutter, so we need smart storage tricks.
Vertical wire baskets help a ton. We can hang these baskets right on our camper walls with just a few simple tools. They’re light, sturdy, and you can see what’s inside at a glance.
Hanging them near the door works perfectly for shoes, hats, or pet leashes. No more tripping over sneakers or searching for that missing flip-flop.
Mounting vertical baskets is quick and doesn’t eat up much space. We love how this DIY adds both style and function.
There are plenty of ideas online, including some great video guides to walk us through the steps. We can pick baskets that match our vibe, or even spray paint them for a pop of color.
It’s a simple way to make every inch of our camper work for us. Plus, we’ll always know exactly where everything is.
2) Use tension rods vertically inside cabinets to hang spray bottles or small tools.
Let’s talk about one of our favorite storage hacks—using tension rods vertically inside cabinets. We’re always hunting for ways to clear up shelf space and keep things from turning into a messy jumble.
Vertical rods can be a real game changer, especially in tiny camper cabinets. Here’s what we do: place a tension rod from the top to the bottom of a cabinet, then hang spray bottles or small tools from the rod.
It’s way easier to see and grab what we need this way. This trick is especially handy for cleaning supplies, so we’re not always digging through a pile under the sink.
It works well for any spot where a rod can fit inside a narrow area. We can even add a few S-hooks or baskets to make the most of every inch.
This idea doesn’t need screws or damage the cabinets. If we want to move things around, the rods come out in seconds.
It keeps our camper neat and makes cleaning up a bit faster, too!
3) Hang a pegboard on an empty wall to customize with hooks and shelves for utensils and gear.
We all know space is tight in small campers. That’s why a pegboard can be our secret weapon.
If we find any blank wall, we can hang a pegboard and instantly create a spot to store gear without using up valuable counter space. The beauty of pegboards is how flexible they are.
We get to decide exactly where to put each hook or shelf, so everything fits the way we need. Utensils, spatulas, or even small pots can have their own place.
It’s like making our own custom storage system whenever we want to change things around. Setting up a pegboard is easier than it sounds.
We just need a sturdy board, some basic mounting supplies, and a few hooks or baskets. It feels great to watch our clutter disappear.
If we want some inspiration, outdoor fans use pegboards for all sorts of RV storage, from tools to kitchen stuff. Let’s make the most of every inch and have gear handy right where we need it.
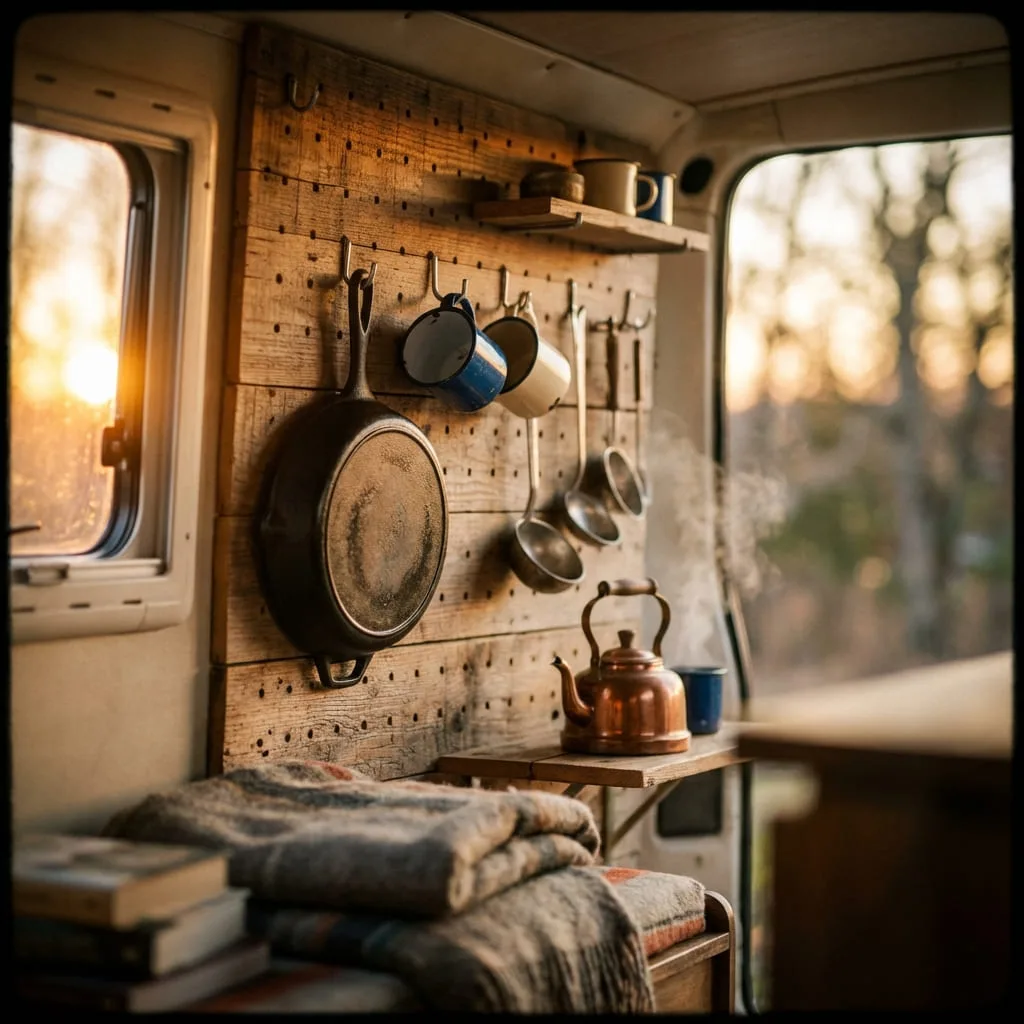
4) Mount magnetic strips for knives, scissors, and metal tools to save drawer space.
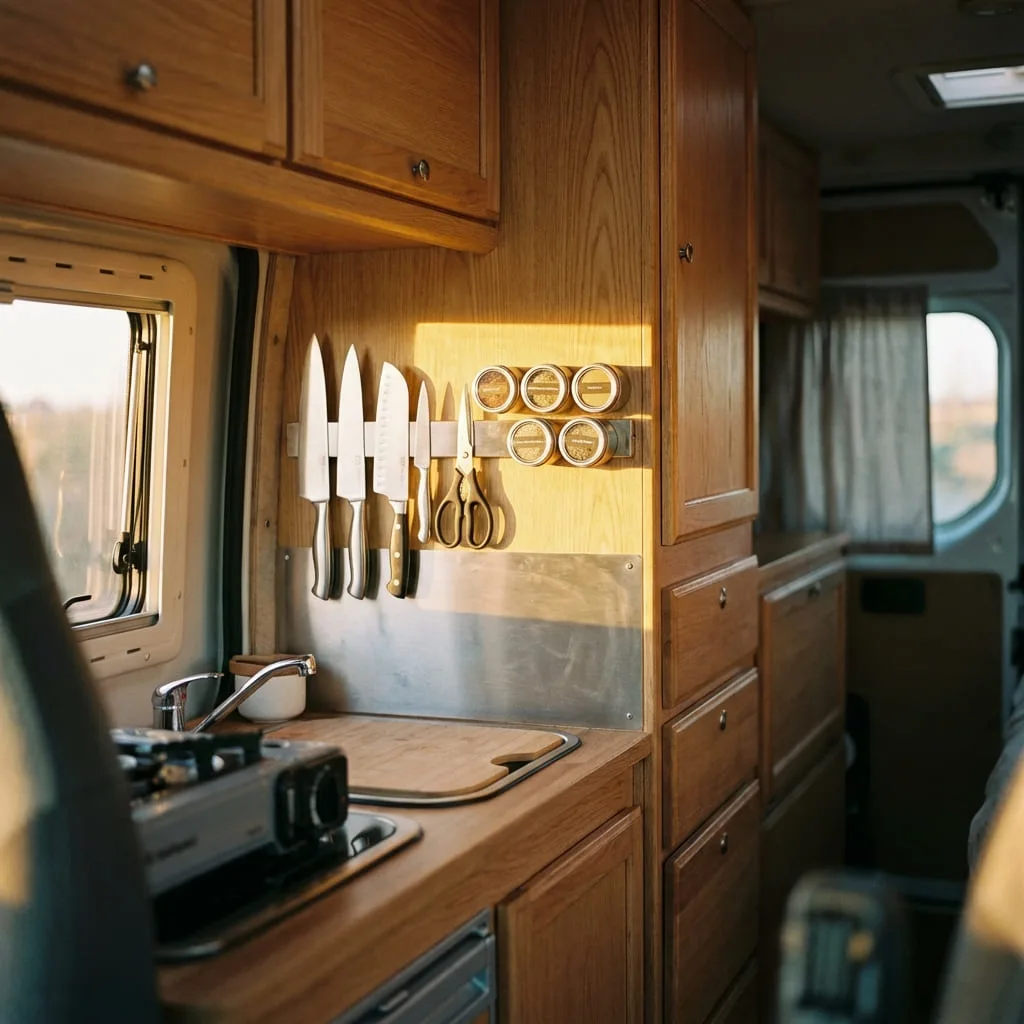
Camper drawers fill up fast. We’ve struggled more than once trying to find a kitchen knife buried under a can opener or spatula.
That’s why magnetic strips are such a game-changer for us. We can hang knives, scissors, and even small tools right on the wall.
This saves precious drawer space and keeps everything in plain sight. No more digging around or worrying about sharp blades loose in the drawer.
There are lots of styles to choose from. Some don’t even require us to drill into the wall.
We just stick them up, load them with metal utensils, and enjoy the clutter-free feeling. Many magnetic strips can be mounted on cabinets, splash boards, or even drywall.

Maximize your small camper kitchen with this heavy-duty magnetic knife holder, designed to securely hold even your largest knives and utensils without taking up valuable counter or drawer space. Made from rust-resistant 304 stainless steel, it’s easy to install with either adhesive or screws—perfect for renters and RV owners. The sleek, space-saving design keeps your kitchen essentials organized, easily accessible, and safely out of the way, making it an ideal solution for compact living and clutter-free travel.
We’ve chatted with friends who use magnetic holders on the side of the fridge or inside cabinet doors. The options are pretty flexible.
They make cooking and cleaning up easy, since everything’s easy to grab and put away.
5) Create DIY fabric pockets secured with Velcro for lightweight item storage on walls or cabinet doors.
Let’s talk about a super quick win—DIY fabric pockets with Velcro! We love this project because it’s budget-friendly and all about making the most of our tiny spaces.
With just a few supplies, we can craft cute pockets that help control clutter in our camper. The best part is how flexible this idea is.
We can stick fabric pockets on any flat surface, like the inside of a cabinet or our camper walls. They’re perfect for holding small things; think phone chargers, sunglasses, or even a deck of cards.
Making them is easier than it sounds. We just cut fabric rectangles, sew up the sides, and add some Velcro strips to the back.
The Velcro keeps everything secure, but we can move or remove pockets whenever we want. If we want a little visual help, there are some step-by-step guides out there.
For example, check out this DIY wall fabric organizer video. We can customize colors and patterns to fit our style and finally stop digging for little stuff every day.
6) Attach wall-mounted mesh netting for quick-stash spots of hats, gloves, or snacks.
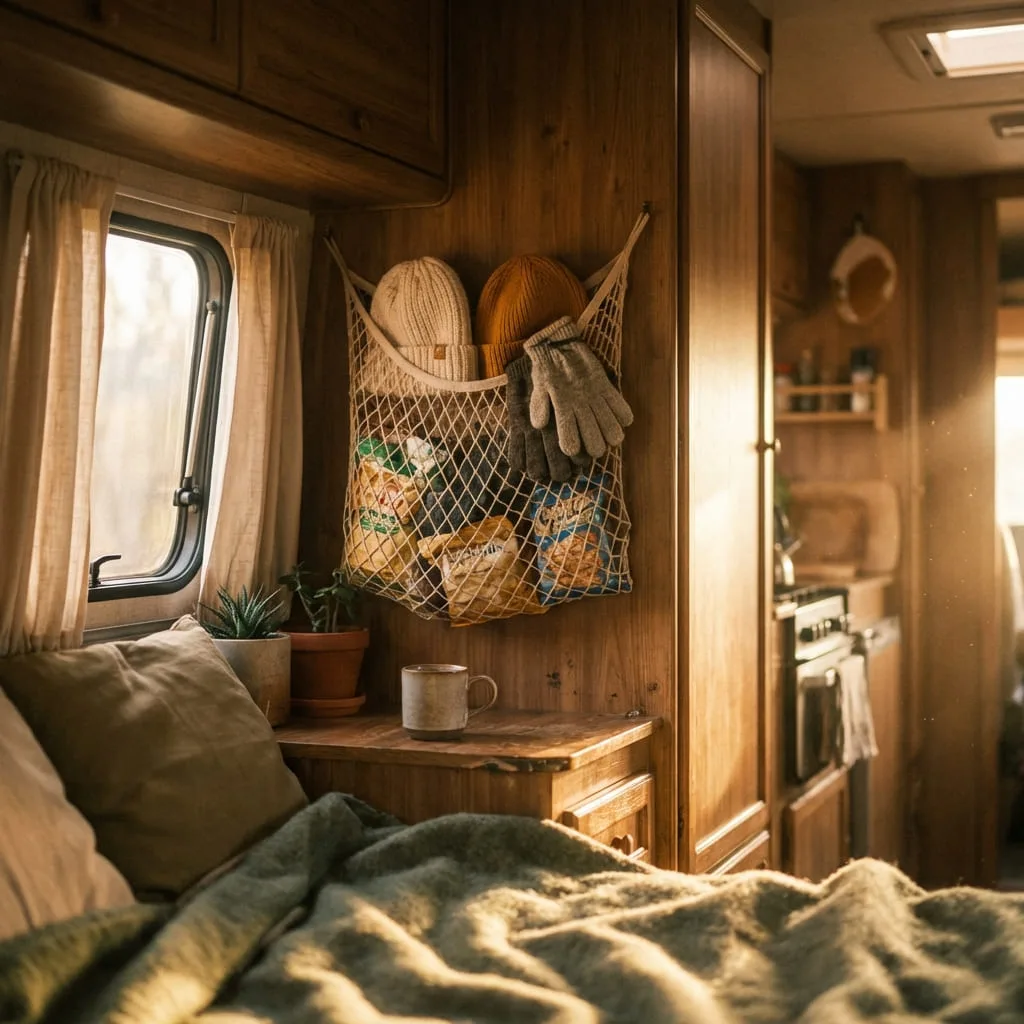
We all know how fast small things like hats or snacks can clutter up a camper. That’s why wall-mounted mesh netting is one of our favorite tricks.
These nets give us extra storage without taking up any floor or counter space. Sometimes we just need a spot to toss gloves, a bag of trail mix, or sunglasses.
Mesh pockets on the wall help us do just that. We can pop things in and grab them quickly when we’re rushing out the door.
These nets are really easy to install, and they come in different sizes. Some use adhesive tape or screws.
The flexible netting can hold lots of oddly shaped items, too. If you want to get started, you can see how others maximize space using handy RV storage netting.

Keep your space neat and organized with the TOBWOLF Mesh Pocket Net, made from high-grade, elastic polyester for sturdy storage that won’t sag. Easily install it anywhere—on both smooth and fluffy surfaces—using the included adhesive tape and hook-and-loop fastener. Perfect for phones, cards, glasses, and other small essentials.
We can even add these near the door or above the bed. Everyone in the family can claim a net pocket for their stuff.
It’s such a simple upgrade, but it helps us all stay organized and feel more at home in our tiny space.
7) Repurpose an old shoe organizer hung vertically behind a door for extra pockets.
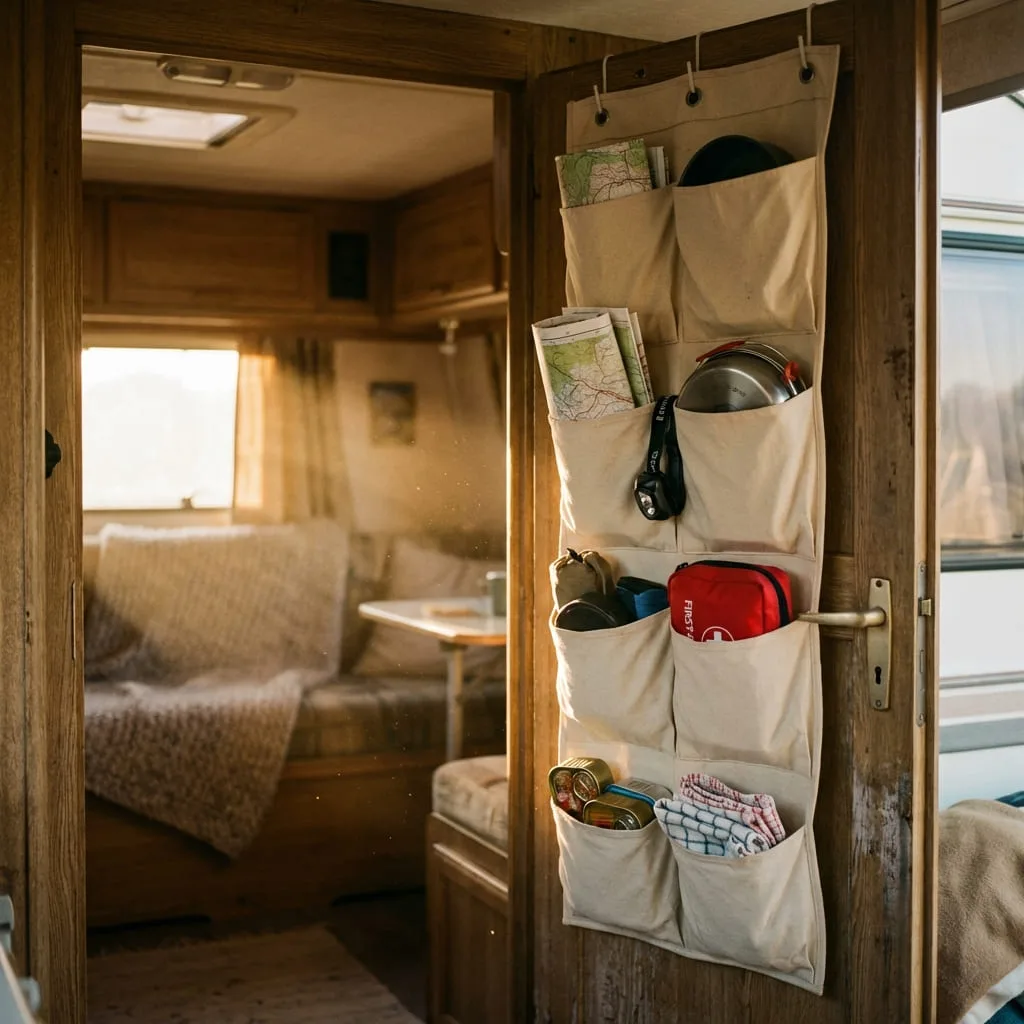
Finding space for all our little things in a camper can feel impossible. That’s why using an old shoe organizer is one of our favorite hacks.
When we hang it vertically behind a door, we get dozens of extra pockets, and we’re not wasting an inch of space. We’ve used ours to hold everything from flip-flops and bug spray to flashlights and snacks.
It’s so helpful for tiny items that always disappear in cabinets. Honestly, we love skipping those last-minute searches for our keys or sunscreen.
The best part? We didn’t even have to buy anything new. There are tons of creative ideas online, like hanging the organizer sideways or cutting it to fit smaller spots—just check out some fun examples on Pinterest.
We get to be resourceful and tidy without spending a lot of time or money. Every bit of extra pocket space helps make our adventures a little easier!
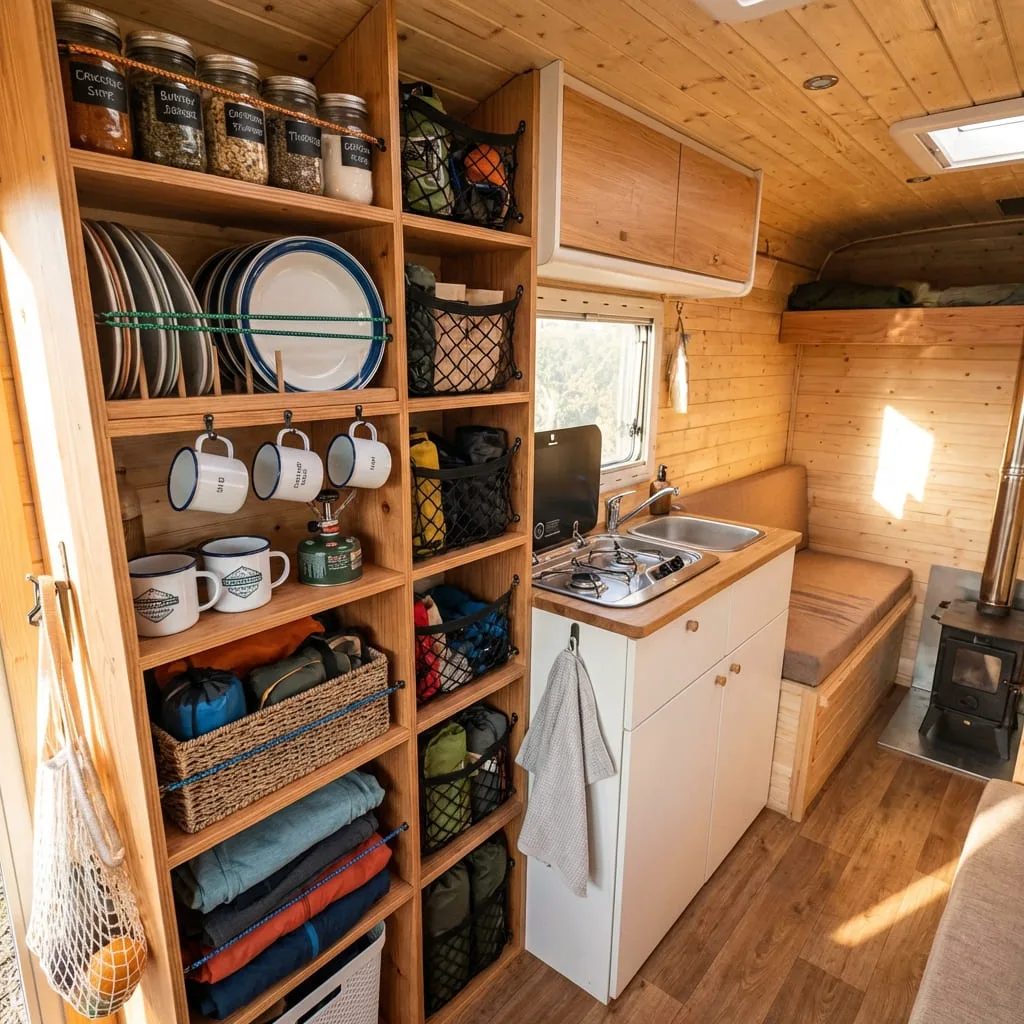
8) Build slim vertical shelves from rough cut lumber to hold spices, books, or decor.
Let’s talk about those tiny spaces in our campers that never seem useful. We can turn those awkward gaps into clever storage by building slim vertical shelves.
Rough cut lumber brings a bit of rustic vibe, but it’s also sturdy enough for small items like spices, paperback books, or even a little decor. We don’t have to be pro woodworkers to do this.
Even if we’re just starting out, a simple look can go a long way. After measuring our space, we can cut the boards to size, giving them a quick sand so nothing catches or splinters.
If we want a more finished look, we can stain or seal the wood. These shelves can tuck right next to the pantry, by the door, or along any narrow wall.
Floating or flush-mount styles work well. If we need inspiration or quick how-to’s, there’s a handy guide to building easy and inexpensive DIY shelves online.
Vertical shelves keep clutter off the counter and make our essentials easy to grab. Plus, making them ourselves just feels satisfying.
It’s one of those projects that starts small but makes a big difference in how our camper feels day to day.
9) Set up a vertical garden planter on the camper wall for fresh herbs and greenery.
Nothing makes a camper feel homier than a little bit of green. If we add a vertical garden planter to the wall, we get both fresh herbs for cooking and a nice boost of color inside.
We don’t need much space or fancy tools for this project. Even simple pocket planters, stacked shelves, or easy DIY pallet ideas can work.
It’s all about using that empty wall space in a smart way. Herbs like basil, mint, and parsley grow well in small planters.
We can also mix things up with a few trailing vines or flowers for variety and good vibes. Mounting our planter close to the kitchen area means we have fresh ingredients within arm’s reach.
Taking care of living plants gives us a daily connection to nature, even when we’re parked far from home. Let’s try a DIY vertical wall planter.
We’ll enjoy more flavor in our meals—and a touch of nature wherever we roam.
10) Use command strips to hang lightweight baskets or caddies without damaging surfaces.
We all know how tricky it can be to add storage in our camper without putting holes in the walls. That’s where command strips save the day.
We can use them to stick lightweight baskets or caddies anywhere we need a little extra organization. No drills, no mess—just peel and press.
We’ve hung up small baskets for snacks, bathroom supplies, and even our keys. The best part? We don’t have to worry about damaging the wallpaper or finish.
Command strips are easy to remove when it’s time to switch things up. If we’re dealing with wallpaper, it’s good to check the strip labels, since some brands recommend avoiding wallpapered spots.
Hooks and baskets work best on flat surfaces like smooth wood or painted walls. When we park for the season or want to redecorate, we can swap things around in just a few minutes.
It honestly feels good knowing we’re making smart use of our space without long-term changes. Let’s get creative and see what extra storage we can add with just a few strips!
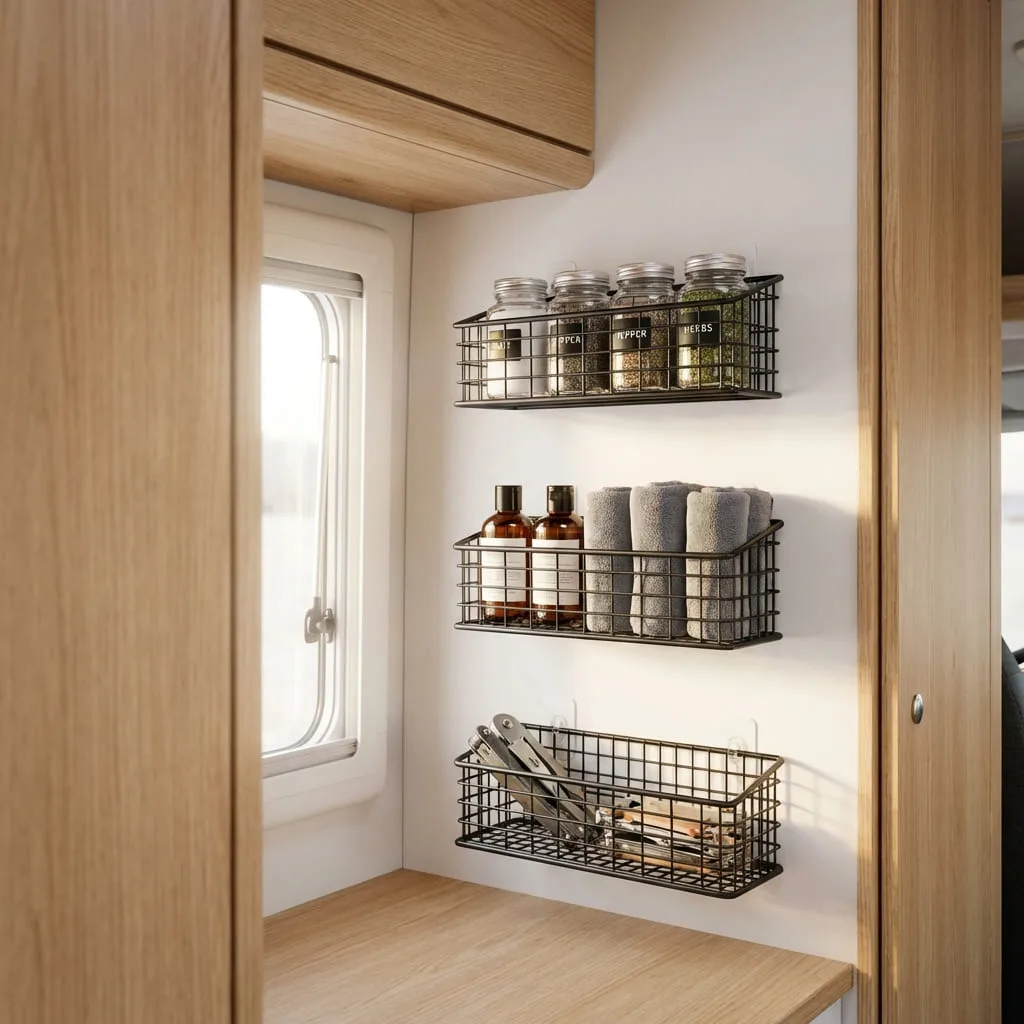
11) Wall-mounted spice rack turned vertical organizer
Ever thought a basic spice rack could solve your camper storage headaches? These compact racks fit perfectly on almost any wall in your RV.
Just install a wall-mounted spice rack near your prep spot or next to your stove. You can buy one cheap or build your own with scrap wood and a handful of screws.
What’s cool about this project is how flexible it is. Sure, it’s meant for spices, but you can stash small bottles, craft stuff, or even toiletries in there. The shelves keep your things visible and right where you need them.
If you’re short on space, try metal strips with magnetic containers. Stick them to any vertical surface. They’re a lifesaver in spots where shelves just won’t fit.
Clear containers make it easy to see what’s inside, so you’re not digging around when you’re hungry or in a hurry. And since everything’s off the counter, you get more room to cook (or just spread out a bit).
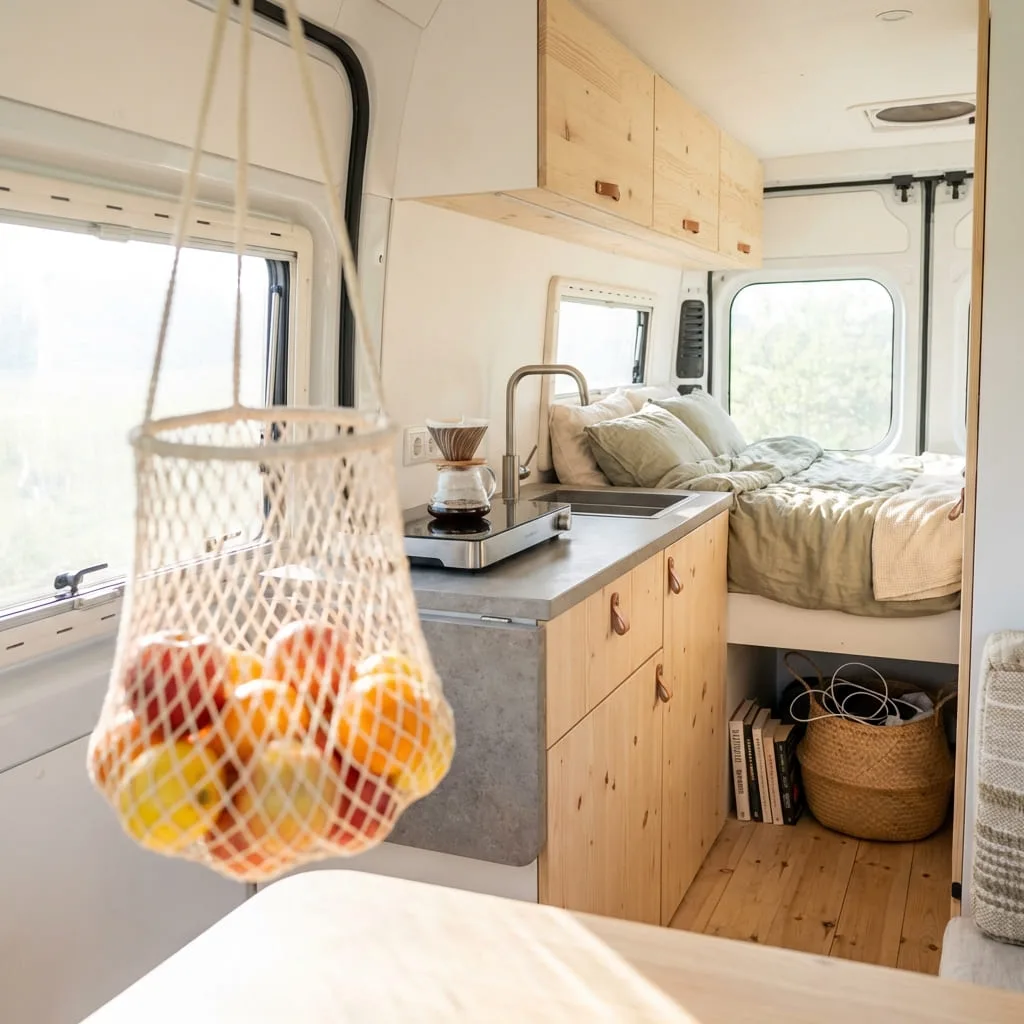
12) Floating shelves made from lightweight pine wood
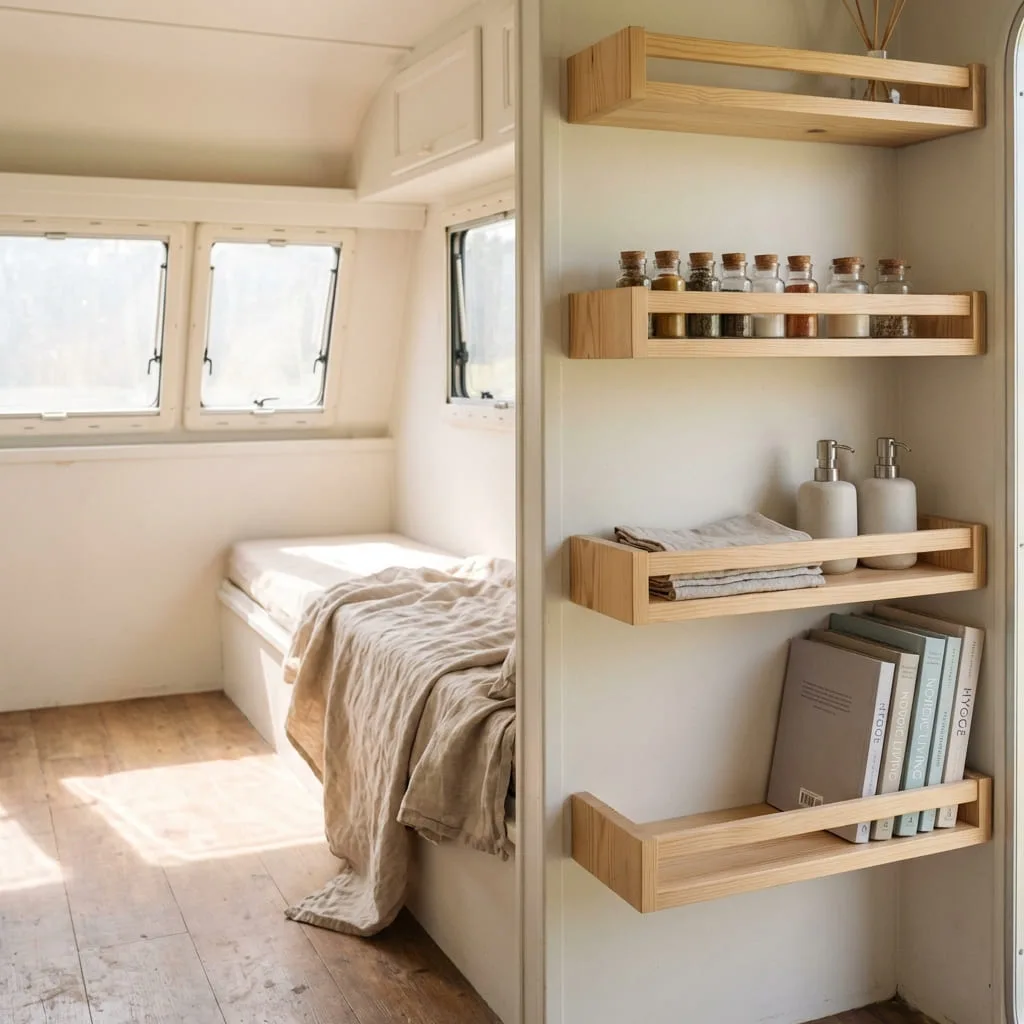
Floating shelves are a game changer for small campers. They keep your floors open and let you use every inch of vertical space.
Pine is a great choice since it’s light and easy to work with. Plus, pine takes stain well if you want your shelves to match your camper’s vibe.
Grab some wood boards, hidden brackets, and a drill. Measure your wall, cut the boards, and make sure you anchor the shelves into studs for stability.
The hidden brackets give your shelves a clean, modern look. Thin floating shelves barely take up visual space but hold a surprising amount.
Store spices, toiletries, or books—these shelves work anywhere. It’s a simple way to maximize every inchwithout cluttering up your camper.
13) Hanging mesh baskets attached to ceiling hooks
If you want more floor space, try hanging mesh baskets from your camper ceiling. These lightweight baskets are awesome for produce, toiletries, or random camping gear.
Just make sure you install ceiling hooks the right way. Find the joists or use toggle bolts for a solid hold. Even though mesh baskets are light, proper installation keeps your stuff safe while you’re moving.
You’ll find wire mesh baskets in lots of sizes. Hang them over your kitchen for fruit, in the bathroom for toiletries, or by your bed for books and chargers.
The mesh lets air flow, which helps prevent mold in humid campers. And since you can see everything inside, you’re not digging through boxes. This vertical storage hack takes just minutes to set up.
14) PVC pipe holders for storing rolled maps and posters

It’s surprisingly easy to make storage tubes out of PVC pipes for your maps and posters in a camper. These tubes keep everything flat and safe, and they fit perfectly in those awkward vertical spacesk – just mount them on a wall or tuck them into a corner.
Cut the PVC pipes so they’re the same length as your rolled-up items. Go for pipes about 3 to 4 inches wide; that’s usually enough for most maps and posters. Cap one end so nothing slides out.
Mount the pipes vertically on your camper’s wall using brackets or straps. If DIY isn’t your thing, you might want to check out ready-made storage tubes for maps.
PVC pipe storage is lightweight, so you won’t notice any extra weight in your camper. The pipes do a solid job protecting your documents from getting bent or torn on the road.
Label each tube so you know what’s inside without pulling out every single one. Using different colored caps or tape makes a quick color-coding system, which saves a ton of time when you’re in a hurry.

15) DIY fold-down Murphy table with built-in shelves

A fold-down Murphy table gives you a workspace that disappears when you don’t need it. Mount it to your wall, and just fold it up to get your floor space back.
The built-in shelves are a real bonus. You get spots to stash camping gear, books, or kitchen stuff right above your table, and everything stays within arm’s reach when you fold the table down.
Building one isn’t as complicated as it sounds. You’ll need some wood boards, hinges, and a couple of brackets. There are step-by-step Murphy table plans online that break down the whole process.
Customize it to fit your space – make it as wide or as narrow as you want. Paint or stain it to match your camper, and suddenly you’ve got a dining table, a desk, or a craft station that vanishes when you’re done.
In a camper, every inch counts. This setup lets you have a full table without sacrificing your living area.
16) Vertical pallet shelf mounted on camper wall
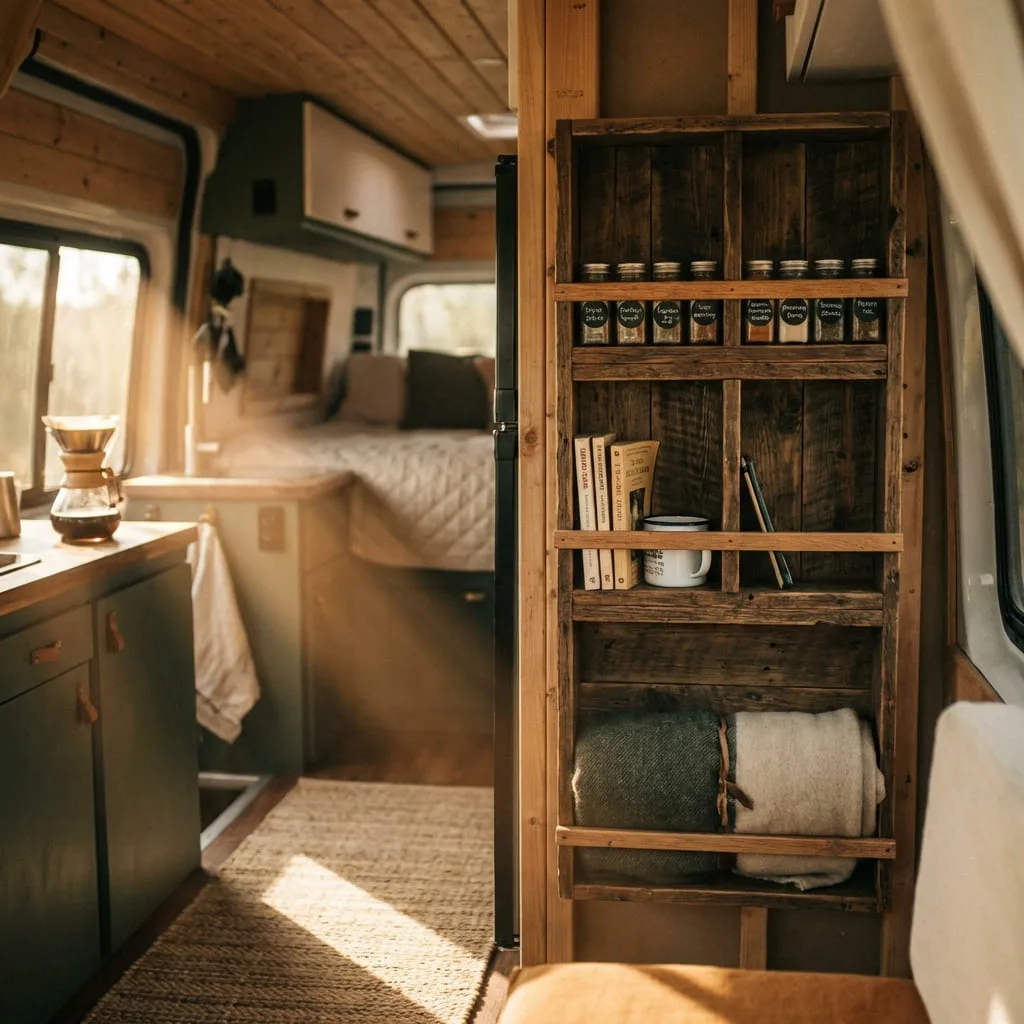
Got old pallets? Turn them into vertical shelves that add a little rustic charm to your camper. Pallet wood comes with built-in sections, which makes it perfect for shelving.
Find a clean pallet and break it down into boards. Make sure to sand, treat, and seal the wood so it looks good and lasts.
Mount your pallet shelf to the wall studs for stability – don’t skip this step, especially if you plan to drive on bumpy roads. The vertical design of pallet shelves gives you several levels to organize stuff like spices, books, or camping gear.
Add a small lip or edge to each shelf if you’ll store loose items. That way, nothing slides off while you’re driving. These shelves work well for kitchen supplies, bathroom stuff, or whatever else you need to keep handy without taking up floor space.
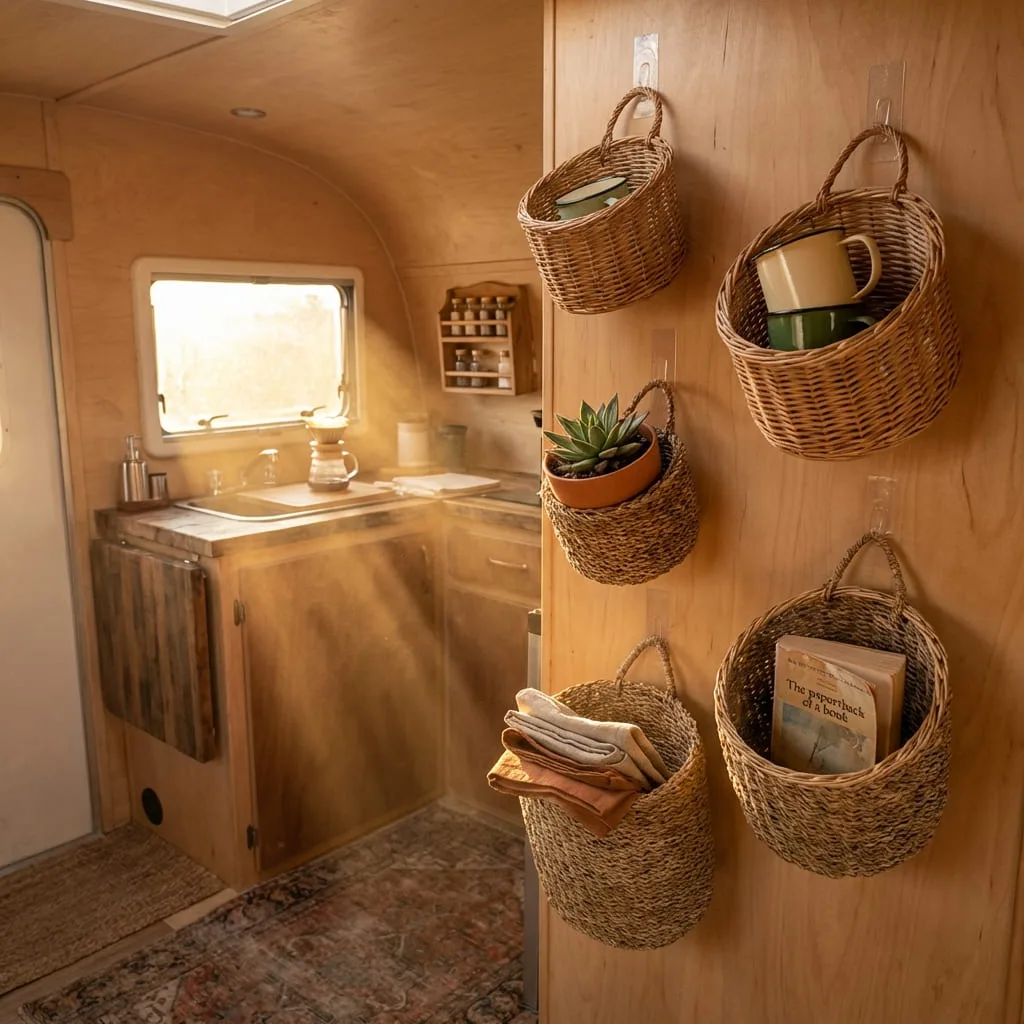
17) Hanging jute rope basket system
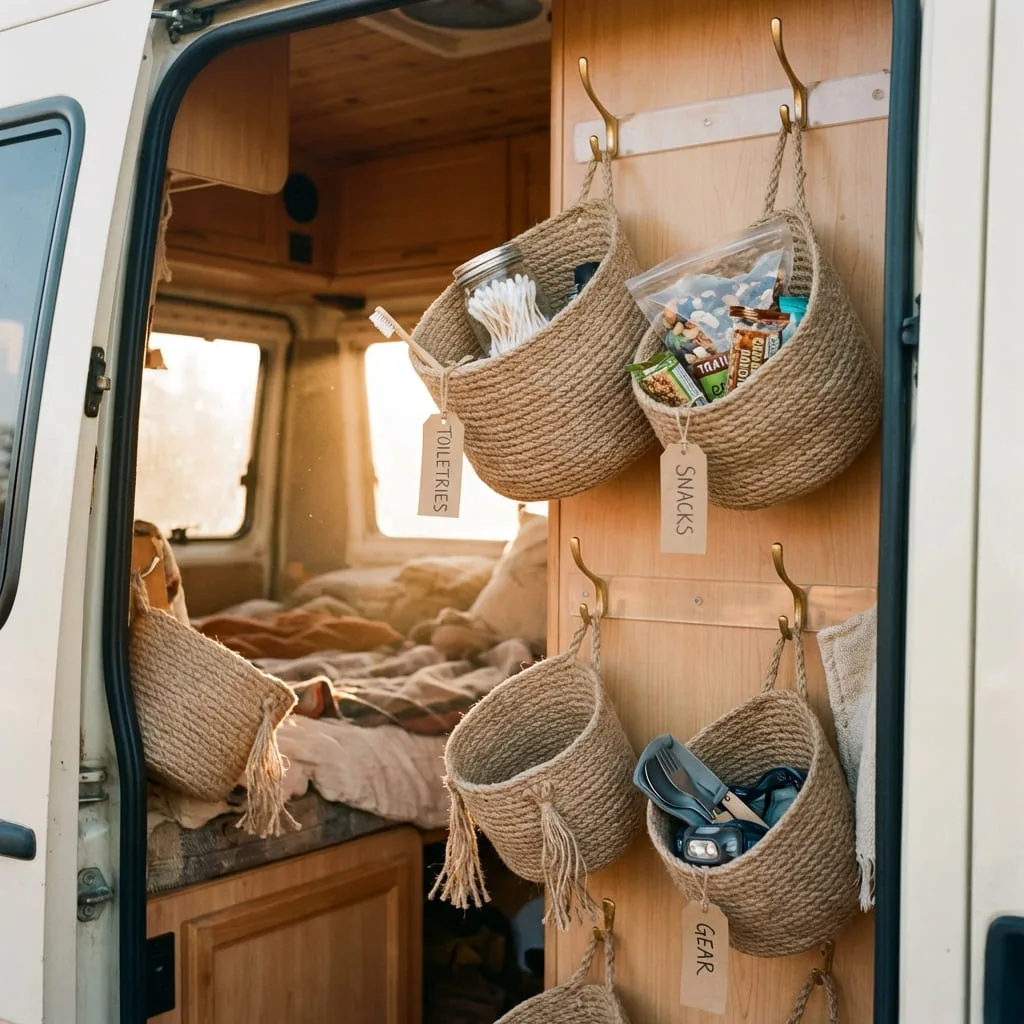
Make your own hanging baskets with jute rope for stylish storage. Hang them from your ceiling or walls to save floor space and keep essentials close by.
All you need is a few packs of jute rope and a hot glue gun to make a basket. You can grab everything at a dollar store, so it’s budget-friendly, too.
Coil the rope into a circle, gluing as you go. Keep building up the sides until you’re happy with the height. Make a few baskets in different sizes for toiletries, snacks, or gear.
Hang them from hooks or command strips on your camper walls. The jute rope adds a cozy, rustic vibeand actually feels pretty sturdy for how light it is.
These baskets work well above your bed, by the door, or even in the bathroom. They’re light, so they won’t weigh your camper down, and you can customize the size to fit whatever you need to store.
18) Hammock-style storage for soft, bulky items
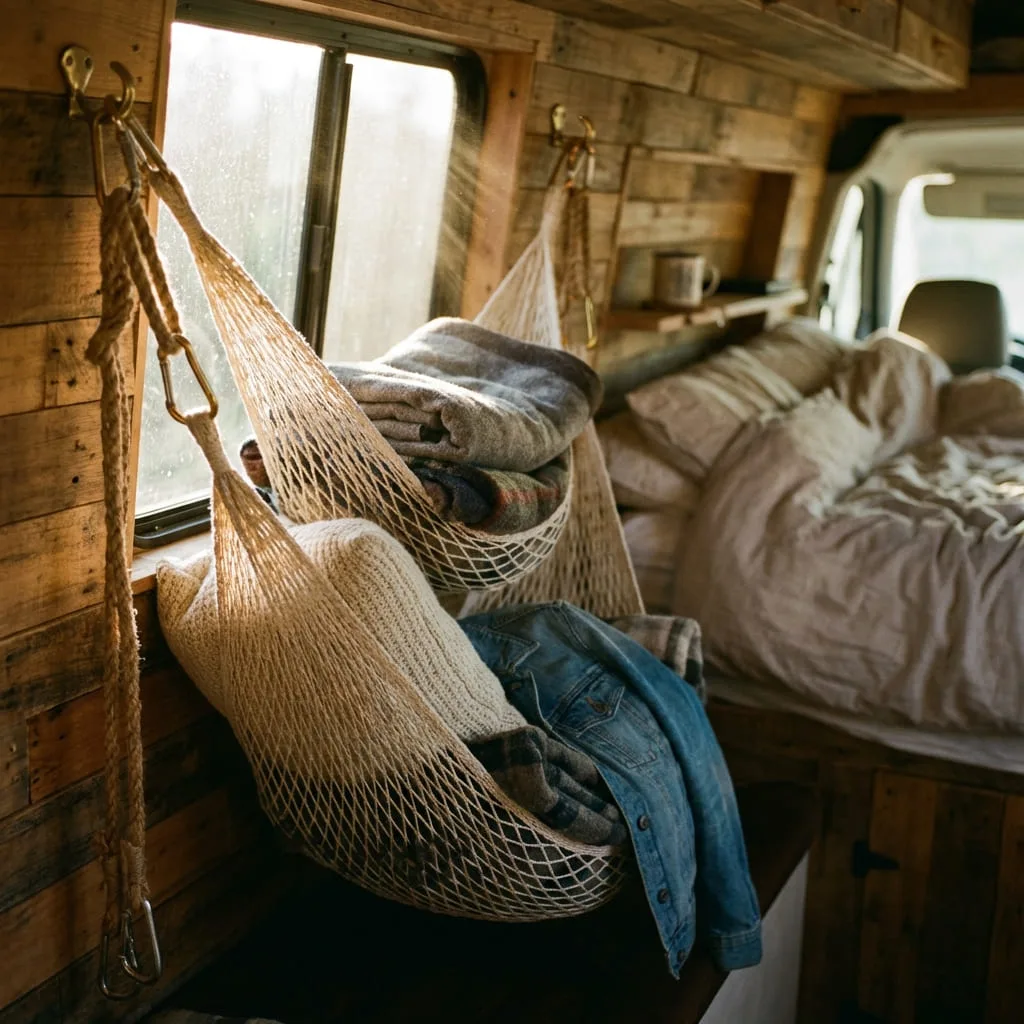
Try hammock storage in your camper to keep things organized and free up floor space. It’s perfect for blankets, pillows, sleeping bags, or jackets that always seem to get in the way in your tiny home on wheels.
All it takes is some mesh netting or fabric and a few hooks. Stretch the hammock across a corner or above your bed, and your soft stuff is easy to grab but out of the way.
This storage uses vertical space you probably weren’t using anyway. Add a few hammocks at different heights if you need even more storage.
The breathable fabric keeps your stuff from getting musty. Plus, you can see everything at a glance – no more digging through bins or cabinets.
Installation is quick – just mount some eye hooks or cup hooks, then attach your netting with carabiners or rope. Adjust the tension to fit more or fewer items, depending on what you need.
19) DIY cork board with hooks for keys and hats
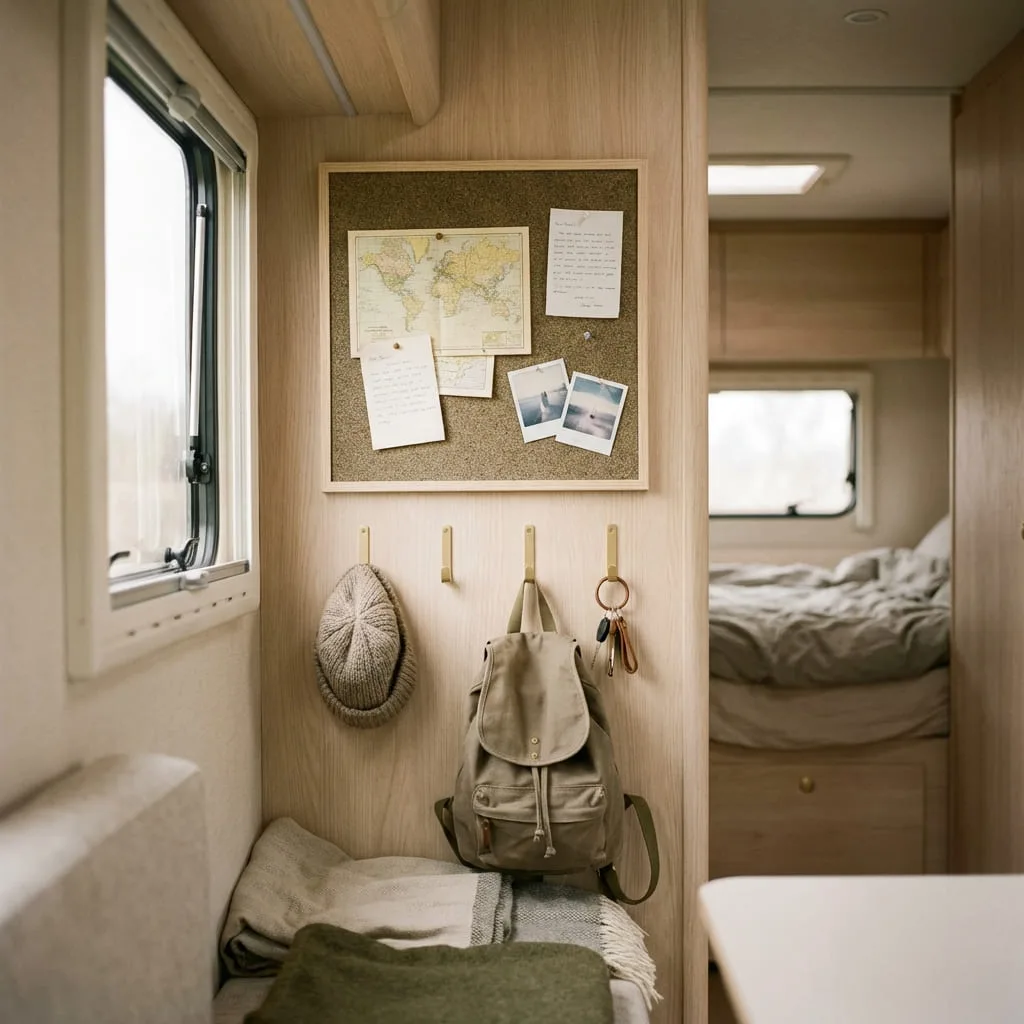
A cork board with hooks just makes sense for a camper’s limited wall space. You get two storage solutions packed into one small setup.
Mount the cork board at eye level near your camper’s entrance. This gives you a handy spot to pin notes, maps, or reminders while you’re out and about.
The cork surface is perfect for pushpins and won’t wreck your walls. Add hooks below the board for keys, hats, or lightweight bags – just attach them to the frame or mount them on the wall underneath.
This entryway organizer style works especially well in small spaces. You can keep it super simple by using an empty picture frame, popping in a cork sheet, and adding hooks.
Some people like to layer fabric and batting over the cork for a softer vibe that matches their camper. Label your keys with tiny tags pinned above each hook so you’ll always grab the right one without any digging.
20) Slim vertical cabinet with sliding shelves
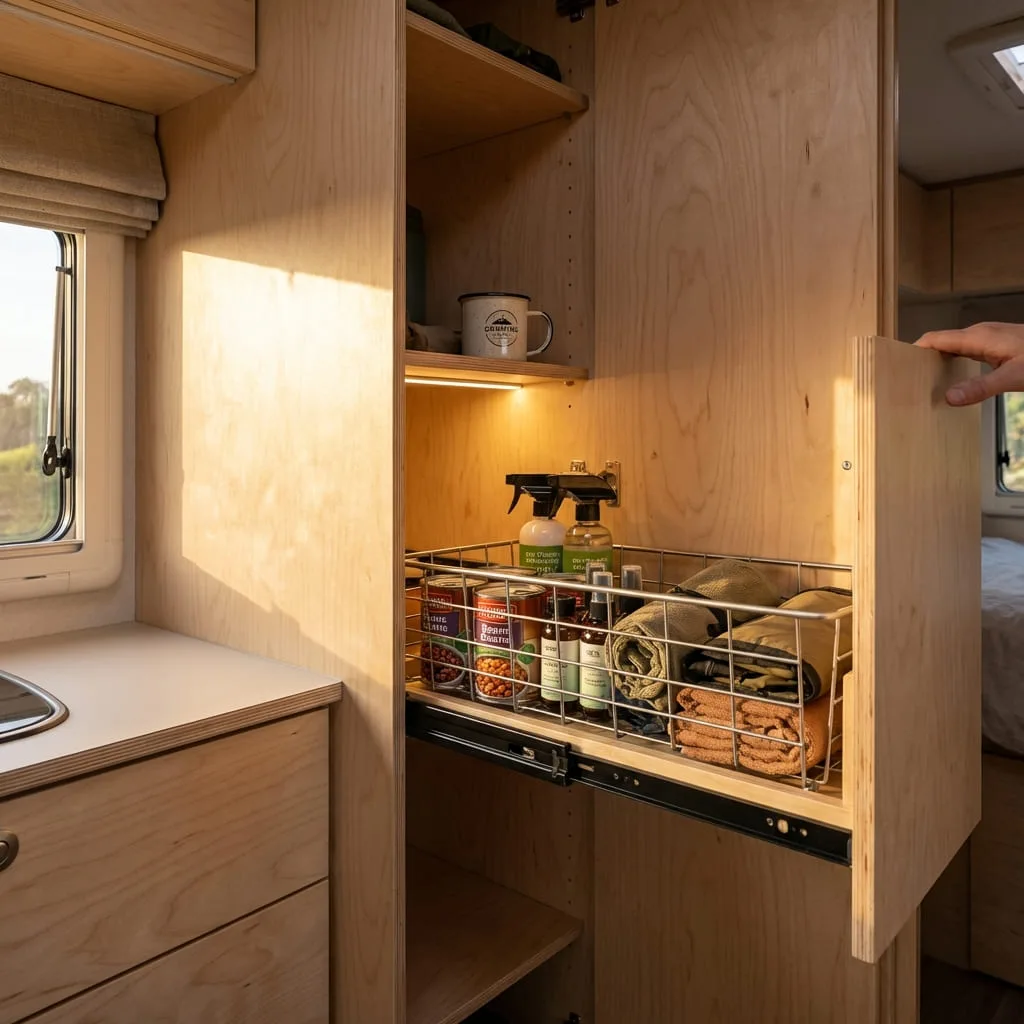
Build a narrow cabinet that barely takes up floor space but offers a ton of storage. The trick is using sliding basket organizers that pull out, so you can reach everything easily.
Measure a tight spot in your camper – sometimes even two feet of width is enough for a slim cabinet.
Use lightweight plywood for the frame. Install sliding shelves or baskets on tracks, so each level pulls out on its own. You won’t have to dig through stuff just to reach the back.
Vertical sliding shelves can hold up to 75 cubic feet in a small footprint, and you get full access to every corner. No more losing things behind a pile of cans.
This type of cabinet is perfect for canned food, cleaning supplies, or gear. The sliding shelves make it way more functional, and the slim design fits into those awkward, narrow spaces you thought were useless.
Essential Tools And Materials For DIY Camper Storage
Having the right tools and materials makes building vertical storage so much easier – and your projects last longer on the road. Focus on lightweight hardware that can handle bumps, affordable materials that fit your budget, and compact tools that won’t hog precious camper space.
Picking The Right Hardware
Your hardware has to stand up to constant movement and vibration. Heavy-duty mounting brackets rated for at least 50 pounds work best for shelves.
Toggle bolts and hollow wall anchors are solid choices when you can’t find studs in thin camper walls. Use stainless steel or zinc-plated screws to avoid rust in humid conditions.
Sizes from 1 to 3 inches usually cover most mounting needs. L-brackets and corner braces add stability to shelves and cabinets that might wobble on the road.
Don’t forget drawer slides with locking mechanisms to keep drawers shut while you drive. Magnetic catches or ball catch latches work well for cabinet doors and cost just a few bucks.
D-rings and bungee cords help secure items on open shelves without making permanent changes.
Budget-Friendly Materials
Plywood is a go-to for camper storage projects since it’s strong, light, and easy to cut. Quarter-inch or half-inch plywood works for most shelves and costs about $20-30 per sheet.
Pine boards are another cheap option at $5-15 per board. They’re great for simple shelves and look nice with a bit of stain.
Wire shelving and metal grid panels from hardware stores offer ready-made solutions for under $20. Repurpose stuff you already have, like old crates or plastic bins, to save money.
Fabric and mesh organizers run about $10-20 and work perfectly behind doors or in awkward spaces.
Space-Saving Tools
You don’t need a full workshop to build solid camper storage. A cordless drill is a must – get one with at least 18 volts.
A handsaw or compact circular saw lets you cut materials without taking up much room. Keep a measuring tape, level, and square handy for straight, accurate projects.
A stud finder helps you find solid mounting spots in camper walls. Round out your kit with a utility knife, sandpaper, and wood glue.
All these essentials fit in a small toolbox that slides under your bed or into a storage compartment.

The BLACK+DECKER 20V MAX* POWERCONNECT Cordless Drill Driver Kit is a versatile, user-friendly tool perfect for DIY projects and home repairs. It comes with a rechargeable 20V MAX* lithium-ion battery that ensures you're always ready for your next task, and features a 24-position clutch for precise control while preventing screw stripping. Included in the 100-piece set are a variety of bits and accessories, all conveniently stored in a zippered carrying case, making it a comprehensive solution for drilling through wood, metal, and plastic.
Tips For Maximizing Vertical Storage In Small Campers
Planning your vertical storage up front – and dodging common mistakes – helps you squeeze every inch out of your camper. The trick is adapting good ideas to your unique space.
How To Plan Vertical Space Efficiently
Start by measuring all your wall space from floor to ceiling before you buy or build anything. Write down the dimensions for each wall, including above doors, windows, and around furniture.
Think about what you’ll store in each spot based on how often you use it. Heavy stuff like canned food should stay low, while lighter things – clothes or bedding – work fine up high.
Keep your most-used items at eye level. Lightweight wall-mounted shelves made from aluminum or plastic are smart because they don’t add much weight.
Draw a quick sketch of each wall with your storage plan before drilling anything. Check your camper’s weight limits too – overloading one side can mess with how your camper handles on the road.
Common Mistakes To Avoid
Don’t install storage without finding the studs first. Screwing into thin paneling won’t hold and could mess up your walls.
Use a stud finder to find solid mounting points. Avoid blocking vents, windows, or access panels with your storage – airflow matters, and you’ll want access to important systems.
Leave at least two inches around vents. Lots of folks forget to secure items before driving, which can lead to broken stuff or even safety issues.
Add bungee cords, rails, or latches to keep things in place. Skip storage that sticks out too far into walkways – you’ll bump into it, and your space will feel cramped. Try to keep everything flush or within six inches of the wall.
Adapting Ideas For Any Layout
Every camper’s floor plan is a little different, so you’ll probably have to tweak standard ideas to fit your own setup. Pegboards actually work great in kitchens, bathrooms, or garage spaces since you can move the hooks around whenever your needs change.
Keep an eye out for those weird, overlooked spots – like above the door or that awkward gap between your cabinets and the ceiling. Even if those spaces are narrow, they’re perfect for sliding in cutting boards, baking sheets, or folded towels.
Key adaptation strategies:
- Measure twice before you cut or drill
- Go for adjustable systems instead of fixed ones
- Pick storage pieces that match your camper’s vibe
- Stick with the same hardware style for a cleaner look
If a plan calls for a certain size, just scale it up or down to fit your walls. What works as a 24-inch shelf in one camper might need to be just 18 inches in yours to actually fit.
Maintaining And Updating Your Storage Solutions
Vertical storage setups in campers need a little regular love if you want them to stay safe and useful on the road. Small tweaks and quick upgrades help keep things organized without a huge overhaul.
Seasonal Checks And Organization
It’s smart to give your vertical storage a once-over every few months. Check all your mounting hardware – especially screws and brackets – since road bumps can loosen them up over time.
Tighten anything that feels wobbly, and swap out worn parts before they break. Moisture is another thing to watch for around storage areas, since water can mess up wood shelves or make metal fixtures rust.
Wipe the surfaces down and add fresh sealant if you spot leaks. Take a few minutes to reorganize your stuff based on what you actually use right now.
Keep your most-used gear at eye level, and stash seasonal stuff higher up. That way, your vertical storage system actually works for your current needs.
At least twice a year, pull everything out of your storage units. Vacuum behind shelves and in those dusty corners where junk collects. This stops musty smells and keeps pests away.
Easy Upgrades Over Time
You don’t have to start from scratch to make your storage better. Stick-on LED lights under shelves can brighten up dark corners for less than twenty bucks.
Swapping basic hooks for adjustable ones helps with different item sizes. Adding small baskets or bins can tidy up vertical spaces that feel cluttered.
Bungee cord systems can sometimes work better than cabinet doors, letting you see what’s inside and keeping things in place while you drive. If your fabric pocket organizers are looking tired, swap them for fresh ones in new colors to change up the vibe.
Painting or staining older wooden storage units to match your updated interior is a five-dollar fix that makes a huge difference. No need to replace everything if you don’t have to.
Frequently Asked Questions
Storage headaches in small campers are pretty common – finding spots for spices, kitchen tools, or outdoor gear can be tricky. Luckily, simple DIY fixes like pegboards, floating shelves, and hanging organizers usually solve the problem without eating up floor space.
How can I create additional storage on the walls of my camper?
Camper walls usually have a surprising amount of unused space you can turn into storage. A DIY pegboard wall lets you hang tools, utensils, and random essentials however you want.
Lightweight floating shelves are awesome for books, decorations, or daily items. They fit nicely above counters, next to the bed, or in pretty much any open spot on the wall.
Try hanging mesh baskets from ceiling hooks near the walls. These are handy for snacks, produce, or lightweight gear you want to keep close by.
Are there any space-saving solutions for a camper’s kitchen area?
A wall-mounted spice rack becomes a vertical organizer if you stick it inside cabinet doors or on empty wall space. It’s perfect for small jars, packets, and cooking supplies without taking up counters.
Stick a tension rod inside cabinets to add shelf space for plates and cutting boards. Over-door shoe organizers can double as kitchen storage for bottles or cleaning stuff.
Mount magnetic strips on the wall for metal utensils and knives. Hanging baskets under cabinets are great for fruit, veggies, or kitchen towels.
What are some easy-to-build organizers for camper closets and drawers?
Stack repurposed wine crates vertically to create cubbies for shoes, clothes, and accessories. Secure them with screws or brackets so they don’t tip over.
Fabric pocket organizers made from canvas or denim can hang inside closets or on doors. They’re great for socks, chargers, and toiletries, and you don’t need fancy tools to put them up.
Cut drawer dividers from cardboard or thin wood to keep things separated. Tension rods in closets are an easy way to add hanging space for lighter items.
Can you suggest ways to keep personal items neatly stored while on the road?
Hang mesh baskets from ceiling hooks for stuff you use all the time. They keep things easy to see and grab, without being in the way.
Use small bins or baskets labeled for each person so everyone knows where their stuff is. Slide them under beds or stack them on vertical shelves.
Collapsible containers are handy for things you don’t use every day. Just flatten them when they’re empty to save space.
What’s a good way to store outdoor gear in a small camper without cluttering?
Put up a pegboard wall near your camper entrance for outdoor gear. Hang boots, backpacks, flashlights, and tools on hooks wherever you want them.
Wall-mounted hooks or rails work for long stuff like camping chairs or fishing rods. They keep everything upright and easy to grab when you stop.
Mesh organizers are a lifesaver for smaller gear – think gloves, hats, or water bottles. Attach them to walls or inside closet doors so they’re out of the way but still handy.
Do you have tips for organizing electronics and gadgets in limited camper spaces?
Cable management gets a whole lot easier with wall-mounted organizers that double as charging stations. Try drilling small holes in floating shelves to run charging cables through—keeps your devices off the counters and out of the way.
Stick some small fabric pockets near your bed or sleeping area. They’re perfect for stashing phones, tablets, or e-readers overnight.
Velcro strips work wonders for bundling chargers and cables. Just slap them on the wall or along the edge of a cabinet so cords aren’t everywhere.
Set up a dedicated electronics basket on a floating shelf. If you label different sections for things like cameras, batteries, headphones, and charging stuff, you’ll always know where to look.