Campfire Nachos: The Ultimate Outdoor Cooking Guide
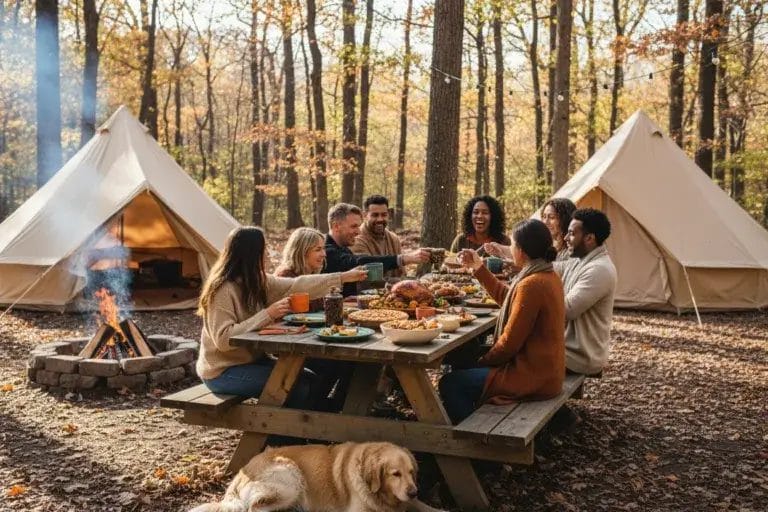
There’s nothing quite like gathering around a crackling campfire with friends, swapping stories under a sky full of stars. Add in a big skillet of cheesy nachos and, well, you’ve just turned an ordinary evening into something unforgettable.
Campfire nachos bring all the comfort of bar food right to your campsite. They’re easy, crowd-pleasing, and let’s be honest, impossible to resist after a day outdoors.
Making campfire nachos is super easy. Just layer up a few basic ingredients in a Dutch oven or cast iron skillet, then let the heat of the coals work its magic until the cheese bubbles and melts.
The best part? You can riff on the recipe with whatever you’ve got on hand. Cheese and beans if you’re keeping it classic, or toss in leftover grilled chicken, veggies, or anything that sounds good.
Campfire nachos turn a simple meal into a fun, hands-on experience. Everyone loves crowding around the fire, watching the cheese melt and get all golden and irresistible.
Whether you’re cooking for two or feeding a whole crew, nachos hit that sweet spot of being both satisfying and super easy. They’re the kind of meal that makes you look like a campfire hero with minimal effort.
Key Takeaways
- Layer chips, cheese, and toppings in a Dutch oven or cast iron skillet, then cook over hot coals.
- Build your layers thoughtfully and use a lid to trap heat for best results.
- Customize your nachos with any ingredients—great for groups big or small.
What Are Campfire Nachos?
Campfire nachos take the comfort food you love and give it a smoky, outdoorsy twist. Imagine crispy chips and melted cheese, but with that unmistakable flavor you only get from cooking over real flames.
Why Campfire Nachos Are a Camping Favorite
Campers swear by campfire nachos because they’re fun, easy, and bring everyone together. After a long day outside, nothing hits the spot quite like a cheesy, shareable meal.
They’re forgiving, too. No need for fancy timing or exact measurements, just layer chips, cheese, and whatever else you’ve got, and let the fire do the rest.
You can make them with whatever equipment you have. Dutch oven? Perfect. Disposable foil pan? That works too. Even a small camping pot will do if you’re backpacking and keeping things light.
There’s something about nachos that turns dinner into a social event. People gather around, toppings in hand, ready to build their perfect plate. Even picky eaters find something to love.
Cleanup’s a breeze. One pot, maybe a layer of foil, and you’re done. That’s a win in my book after a long day outside.
Campfire Nachos Versus Traditional Nachos
So, what’s the big difference between campfire nachos and the ones you get at a restaurant? It’s all about the cooking method and that smoky flavor you can’t fake indoors.
Layering matters more when you’re outdoors. Chips go down first, then cheese and toppings, and repeat. The goal? Every bite gets a little bit of everything.
Ingredient choices shift, too. Instead of fresh tomatoes and lettuce, you might pack canned beans, jarred salsa, or veggies that won’t wilt in your cooler.
The cooking vessel changes the game. Dutch ovens give you even, melty cheese, while foil packets are perfect for individual servings and easy cleanup.
Managing temperature is more hands-on at the campsite. You’ll learn to move your pot or coals around, watching for hot spots and adjusting as you go. It’s a little less predictable, but that’s part of the fun.
Essential Ingredients for Campfire Nachos
Building great campfire nachos is all about the layers. Tortilla chips and cheese create the base, but the right beans, proteins, and toppings turn a snack into a meal.
Must-Have Basics: Chips, Cheese, and Beans
Tortilla chips are the backbone here. Thick, restaurant-style chips hold up best – trust me, flimsy chips just turn to mush.
Cheese is everything. I like a mix of sharp cheddar, Colby, and Monterey Jack, but any good melting cheese works. Pre-shredded blends save time, which is always a plus at camp.
For beans, you’ve got options. Black beans add protein and texture, while refried beans create a creamy middle layer that holds things together.
Canned beans are your friend; drain and rinse them at home to save time and weight. No one wants bean juice leaking in the cooler.
Toppings to Elevate Your Nachos
This is where you can get creative. Diced tomatoes brighten things up, and avocado adds creamy richness (just wait to slice it until serving, or you’ll end up with brown mush).
Cilantro and green onions give a fresh, herby kick. Jalapeño slices bring the heat, and black olives add a little salty punch.
Sour cream and guacamole cool things down if you went heavy on the spice. Salsa brings moisture and flavor, and a squeeze of lime over the top is pure magic.
Pro tip: Chop your veggies at home. It makes campsite prep way easier, and you won’t be chasing runaway tomatoes across the picnic table.
Protein Options and Variations
Ground beef is a classic. Season it with taco seasoning for that familiar flavor, and cook it at home if you want to make life simple at camp.
Leftover grilled chicken is fantastic, just shred and toss it in. Pulled pork brings smoky depth, and it’s a nice change if you want to mix things up.
Queso fresco doesn’t melt like cheddar but adds creamy bites throughout. I like to mix it in for a little texture surprise.
Vegetarians, you’re covered. Load up on beans or add extra veggies like bell peppers and corn. No one misses the meat when the toppings are this good.
That’s the beauty of nachos, everyone builds their dream bite. There’s no wrong way to do it, so play around and see what you love.
Choosing and Using the Right Equipment
The right gear can make or break your nacho game. A sturdy cast iron skillet or Dutch oven spreads the heat evenly, while foil pans are great for quick cleanup (and lazy campers like me sometimes go that route).
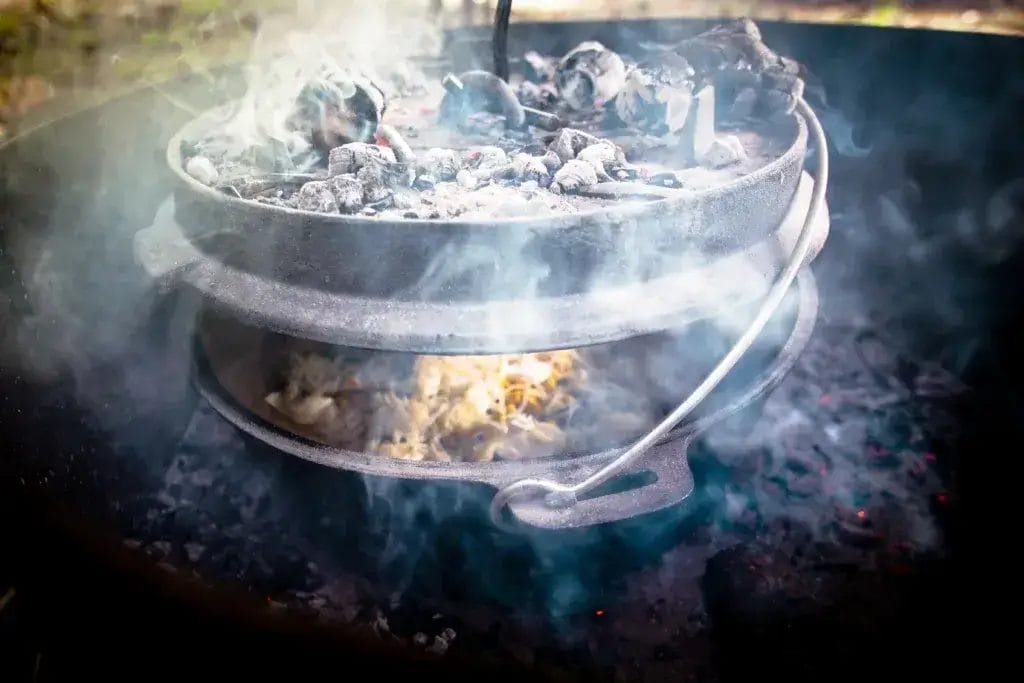
Dutch Oven Magic: Why It’s a Game-Changer
A cast iron dutch oven turns campfire cooking into a breeze. The heavy lid traps heat, melting cheese evenly and keeping the bottom from burning.
Once you cook with a Dutch oven, you’ll wonder how you ever camped without one. The thick walls hold heat so well, even rookie cooks end up with perfect nachos.
Here’s a tip: Preheat your Dutch oven for a few minutes before adding chips. It helps prevent sticking and gives you those crispy edges everyone fights over.
A 12-inch Dutch oven feeds a crowd, while a 10-inch is just right for a smaller group. Plus, it keeps food warm long after the fire dies down, ideal for those slow, lingering campfire chats.
Cast Iron Skillet Know-How

A cast iron skillet gives you control and convenience. Unlike cheap pans, cast iron stands up to high heat and creates those golden, crispy nacho edges we all crave.
Let your skillet heat slowly over coals, not flames, to avoid burning the chips. The wide surface is perfect for layering all your ingredients.
Cooking campfire nachos in a cast iron skillet takes a little patience, but the results are worth it. If you don’t have a lid, cover the skillet with foil to trap heat and melt the cheese.
Cleanup is surprisingly easy. Just hot water and a scrub brush, and you’re back in business. Honestly, a little campfire patina on your skillet just adds character.
Pro Tip: Put tin foil on the bottom of your cast iron skillet or Dutch oven, and then there’s no mess to clean at all. 🙂
Foil Packets and Easy Cleanup Tips
Aluminum foil is my go-to when space is tight or I just can’t face a mountain of dirty dishes. Heavy-duty foil makes it easy to create individual nacho portions that cook evenly and, best of all, there’s nothing to wash after.
The trick is in how you build your packets. I like to shape a foil “bowl” around a pot, then lift it onto the grill grate over the coals. This helps avoid those annoying foil rips that spill dinner into the fire – been there, done that.
Plenty of folks line their cast iron cookware with foil before adding ingredients. It turns your pan into a non-stick wonder, and cleanup is a breeze.
If you’re cooking for a while, double-layer foil packets are your friend. The inner layer holds the food, and the outer layer keeps everything sturdy. I always toss in extra foil, honestly, it’s the Swiss Army knife of campfire cooking.
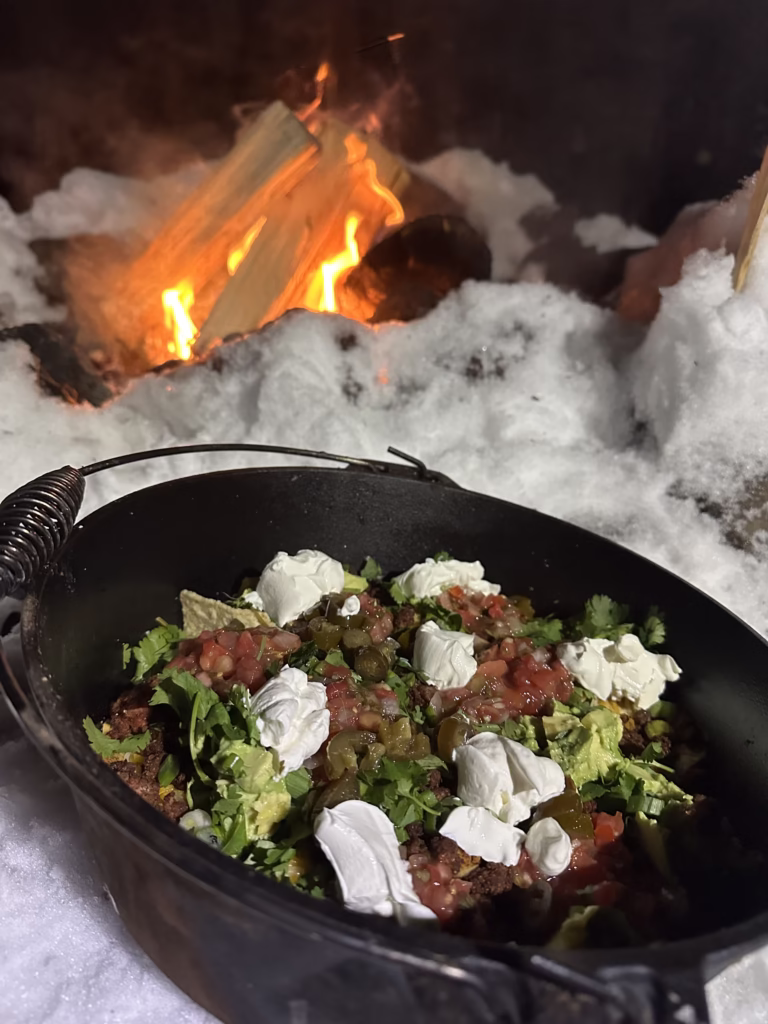
Step-By-Step: How to Make Campfire Nachos
Getting campfire nachos just right is all about how you layer those chips and how you manage the fire. If you time things well, you’ll dodge soggy chips and get that golden, melty cheese everyone wants.
Layering Like a Pro for Ultimate Crunch
The magic starts with how you place your chips. You want an even base; nobody likes digging in and finding only naked chips at the bottom.
Start with the sturdy stuff first. Thick tortilla chips hold up better under gooey toppings. I spread them in a single layer in the skillet, overlapping them like shingles.
Layer in this specific order:
- Base layer of chips
- Half the cheese (this acts as “glue”)
- Meat and beans
- Remaining vegetables
- Final cheese layer on top
This “cheese sandwich” trick is a game-changer. The bottom cheese melts into the chips, creating little pockets of gooeyness, and the top cheese turns golden and bubbly.
Pro tip: Add delicate toppings like green onions and tomatoes after cooking. They’ll stay bright and crisp, not sad and soggy.
Cooking Techniques Over an Open Fire
Managing your fire is half the battle. You want steady, medium heat, not wild flames that burn the bottom and leave the top cold.
Build your cooking zone first. I usually push hot coals to one side of the fire pit to make a bed of even heat. The grill grate sits about 6 inches above. That way, the cheese melts without the chips turning black.
Test the heat with your hand. Hold your palm over the grate. If you last 4-5 seconds, you’re good. Less than 3? It’s too hot, move those coals aside.
Rotate the skillet every 3-4 minutes. Open fires have hot spots, so I give the pan a turn now and then. Look for gentle bubbling at the cheese edges, that’s your green light.
Use aluminum foil as a lid. This traps heat, almost like a little oven, and melts cheese faster while protecting the chips from burning.
Timing and Tips for Perfect Melted Cheese
Melting cheese over an open fire takes a little patience. Rushing it leads to burnt edges and a cold center. I’ve learned that the hard way.
Start with room temperature cheese. If you use cold cheese from the cooler, it’ll take forever to melt. Let it sit out for 15-20 minutes first.
Pick the right cheese blend. Mexican blends melt better than single cheeses. The mix gives you that stretchy, melty magic everyone wants in nachos.
Cook for 10-15 minutes total. First 5 minutes warm things up, then the next 5-10 get the cheese melted. Watch for these signs:
- Cheese bubbling gently
- Edges browning just a bit
- Steam rising from under the foil
Don’t peek too often. Every time you lift the foil, you lose heat and add time. Trust the process, let the steam work its magic.
Avoiding Soggy Chips: Pro Tricks
No one wants mushy nachos. Wet toppings can turn crispy chips into a sad pile of mush, but with a little prep, you can avoid this mess.
Drain everything thoroughly. Canned beans, corn, and tomatoes all have extra liquid. Drain and rinse canned ingredients before adding them.
Pat meat dry after cooking. Ground beef especially gets greasy. A quick blot with paper towels keeps chips crisp.
Keep wet toppings separate. Salsa, sour cream, and guacamole go on after cooking. That way, the chips stay crunchy and everyone gets to customize.
Serve right away. Nachos are best hot off the fire, when the cheese is bubbling and the chips still snap. Transfer to plates fast, no lingering in the skillet!
Creative Twists and Special Diet Variations
Campfire nachos are super flexible. Whether you’re plant-based, gluten-free, or just in the mood for something different, there’s a version for everyone. I’ve seen some wild combos around the campfire, and that’s half the fun.
Vegetarian and Vegan Campfire Nachos
Vegetarian nachos can be just as filling as the meaty kind. Refried beans and black beans make a hearty base that keeps everyone full. I like to mix different beans for texture and flavor, plus, it stretches the meal further.
Black beans go great with roasted bell peppers and corn. The campfire gives veggies a smoky edge you can’t get at home. I usually prep my bean mix at home, seasoning it with cumin and chili powder for a little kick.
Vegan options are easier than you’d think. Nutritional yeast gives a cheesy vibe, and cashew cream adds that rich texture. Some folks swear by homemade vegan cheese sauce; just blend soaked cashews, garlic, and lemon juice.
Fresh avocado on top is always a hit once the nachos have cooled a bit. Diced tomatoes, cilantro, and jalapeños add crunch and color. I always pile these fresh toppings on after cooking for max flavor.
Low-Carb and Gluten-Free Options
Gluten-free nachos are easy if you pick the right chips. Most corn tortilla chips are naturally gluten-free, but check the bag to be sure. You’ll find plenty of certified options in stores now.
For low-carb nachos, try bell pepper boats. Just halve the peppers, take out the seeds, and fill them up. They get sweet and tender over the fire, kind of addictive, honestly.
Zucchini rounds work too. Slice them thick enough to hold toppings, but not so thick that they stay raw. A little salt before cooking helps draw out extra water.
Portobello mushroom caps make sturdy, meaty bases for single-serve nachos. Brush with oil and a sprinkle of garlic powder before loading them up.
Cauliflower florets are another fun base. Steam them lightly, then top with cheese and whatever else you like. They soak up flavor and keep things filling.
Family-Friendly and Kid-Approved Toppings
Kids usually like things to be simple. Mild cheddar melts well and isn’t too strong for picky eaters. Ground turkey or chicken works great for protein; it feels familiar and easy.
Sweet corn adds a little pop that balances out any heat. I’ve noticed kids will try new veggies if they’re mixed with cheese and corn; it’s like a magic trick.
Refried beans help glue toppings to the chips, which means less mess. Kid-friendly versions keep the spice low but still taste exciting.
Individual foil packets are a lifesaver for families. Let kids pick their toppings and watch them cook their own mini nachos. Fewer arguments, more happy campers.
Diced tomatoes, shredded lettuce, and sour cream add freshness. Keep them cold until serving so they stay crisp and cool. A little taste of home at the campsite.
Serving Suggestions and Campfire Nacho Meal Ideas
Campfire nachos can be more than just a snack; they’ll fill up the whole crew if you do it right. Pair them with other camp favorites and store leftovers well to make every bite count.
Making Nachos a Main Event
If you want nachos to be the main meal, add some serious protein. Leftover grilled chicken, seasoned ground beef, or even pulled pork between the layers work wonders.
Essential protein additions:
- Grilled chicken strips from the night before
- Seasoned ground beef cooked in a camp skillet
- Leftover steak cut into small pieces
- Canned chicken for quick prep
Build up the layers so each bite has chips, cheese, protein, and veggies. This way, it feels like a real meal, not just an appetizer.
Hearty vegetable additions:
- Sautéed bell peppers and onions
- Fire-roasted corn kernels
- Diced tomatoes with juice drained
- Jalapeños for heat lovers
A full skillet of nachos usually feeds 2-3 people as a main dish. The cast iron Dutch oven is my secret weapon. It melts cheese evenly and keeps chips crispy underneath.
Pairing with Other Campfire Classics
Nachos love company. Pair them with camping recipes that balance out all that cheesy goodness. Cool sides and cold drinks make the meal sing.
Perfect side combinations:
- Fresh guacamole made at camp
- Crisp coleslaw in a cooler container
- Grilled corn on the cob
- Simple garden salad with lime dressing
Ice-cold drinks are a must. Beer, lemonade, or sparkling water with a squeeze of lime works great. Sometimes I make a pitcher of agua fresca earlier in the day, it’s always a hit.
Complementary campfire dishes:
- Grilled vegetables as a lighter starter
- Campfire salsa made with fire-roasted tomatoes
- Simple quesadillas for extra hungry campers
- Fruit salad for a sweet finish
Cooking nachos fits right in with other campfire meals. While the nachos bubble away, you can grill corn or prep toppings. Somehow, everything comes together at once, and you get that unbeatable feast under the stars. That’s the magic of camp cooking, right?
Leftovers and Storage Tips for the Trail
Nacho leftovers can be a bit tricky since dairy and fresh toppings don’t last long when you’re out in the wild. I always start by keeping ingredients separate as much as possible. Don’t just mix everything together if you can help it.
Immediate storage steps:
- Pull your nachos off the heat right away
- Transfer leftovers to smaller containers within half an hour
- Pop any cold items into the cooler ASAP
- Try to eat leftovers within a couple of hours
Fresh toppings like avocado, cilantro, and sour cream should hit the cooler immediately. Cheese-covered chips can hang out a bit longer, but they’re always tastier warm, so don’t wait too long.
Repurposing leftover ingredients:
- Toss extra cheese into scrambled eggs for breakfast
- Add leftover beans to your morning hash
- Stir any remaining salsa into a pot of camp chili
- Save extra chips for snacking on the trail
Cleanup’s easy if you plan ahead. Line your Dutch oven with parchment paper before cooking so the cheese doesn’t weld itself on. That way, washing up with limited water is way less of a hassle.
Quick cleanup tips:
- Scrape pans while they’re still a bit warm
- Use camp soap and hot water—don’t skimp on the elbow grease
- Dry everything well to keep rust away
- Give your cast iron a light oil rub before packing it up
Frequently Asked Questions
Let’s tackle some of the questions I get about campfire nachos. We’ll cover melty cheese magic, vegetarian options, avoiding burnt chips, and a few creative twists.
What’s the secret to getting that perfect melty cheese on nachos when cooking over a campfire?
Getting cheese to melt just right over a campfire is part art, part science. I swear by using a cast iron Dutch oven or a skillet with a lid. The lid traps steam and melts the cheese evenly, without turning your chips to mush.
Don’t cook directly over big flames. Move your nachos to the side of the fire where the heat’s steady and a bit gentler.
Layering is a game-changer. Sprinkle cheese between layers of chips instead of just dumping it all on top. Every bite gets some gooey goodness that way.
When you’re almost done, slap the lid on for a few minutes. That mini-oven effect gets every last shred of cheese perfectly gooey. It’s a little trick I picked up after too many half-melted disasters.
Can you share some tips for making a vegetarian nacho feast that’ll satisfy everyone around the campfire?
Building a vegetarian nacho platter that wins over even the meat eaters? Start with protein-rich beans, black beans, and refried beans make a hearty base that’s honestly hard to beat.
Warm the beans with cumin, chili powder, and garlic. Those spices bring so much depth, nobody’s going to miss the meat.
Then, pile on colorful veggies. I love diced bell peppers, corn, and jalapeños for a mix of crunch, sweetness, and kick. Makes every bite a little adventure.
Mix up your cheeses, too. Sharp cheddar, creamy Monterey Jack, or even a crumble of queso fresco, don’t be shy about blending for more flavor.
Once you’re done cooking, top it all with fresh tomatoes, cilantro, and avocado. Those bright, cool flavors make the whole thing pop.
How do I prevent my nachos from burning when cooking them in tin foil on an open flame?
Burnt nachos are the worst, right? The trick with foil packets is to double-wrap them with heavy-duty foil. That extra layer protects your food from hot spots.
Always hit the inside of the foil with a little oil or cooking spray. It keeps things from sticking and helps heat spread out more evenly.
Skip the direct flames. Cook your foil packets over glowing coals or embers instead. It’s a much gentler heat and way less likely to scorch the bottom.
Flip the packet halfway through cooking. That move saves more nachos than I can count.
If you can, set the foil packet on a grill grate above the coals. It gives you just enough distance to cook everything through without burning.
I’ve heard about campfire nacho dip. How can I whip that up for my next outdoor adventure?
Campfire nacho dip is pure comfort food and super fun to share. It’s basically all your favorite nacho toppings in one big, melty pot.
Grab your cast iron Dutch oven. Start by layering in cream cheese, shredded cheese, and any toppings you love—makes serving and cleanup a breeze.
Soften the cream cheese first and mix it with salsa or diced tomatoes. That’s your creamy, tangy base.
Next, fold in seasoned ground beef or beans, then pile on more cheese. Let the campfire do its thing until everything’s bubbling and gooey.
Just before serving, scatter on green onions, jalapeños, and cilantro. Hand out some sturdy tortilla chips and watch it disappear.
Are there any innovative twists to traditional campfire nachos using chicken that I can try out?
Chicken nachos are the perfect way to mix things up at camp. Seasoned chicken adds protein and soaks up flavors like a champ.
Try buffalo chicken nachos – shredded chicken tossed in buffalo sauce, topped with blue cheese crumbles and a drizzle of ranch. It’s got a spicy kick that always gets people talking.
Or go for a Mexican-inspired vibe. Season chicken with cumin, chili powder, and a squeeze of lime, then layer it with black beans, corn, and fresh cilantro. It’s a flavor bomb.
BBQ chicken nachos are another favorite. Mix pulled chicken with barbecue sauce, then top with sharp cheddar and green onions. It’s sweet, smoky, and totally satisfying.
If you’re craving fajitas, cook bell peppers and onions with your chicken strips. Throw it all on the chips for nachos that are colorful, crunchy, and packed with protein.
Aside from nachos, what are some other fun and tasty campfire recipes that could be a hit with my family?
Campfire cooking is one of those things that just pulls people together. There’s something about gathering around the fire, swapping stories, and waiting for dinner that makes the whole experience memorable.
When I started out, I thought all I needed was a stick and a marshmallow. Turns out, cast iron skillets and Dutch ovens are the real MVPs of campfire meals. Once you’ve got those, the options open up fast.
One of our family favorites is campfire pizza. Grab some pre-made dough, flatten it out, and let everyone pile on their own toppings. There’s a certain magic in watching your pizza bubble and crisp right over the flames, plus, that hint of smoke just can’t be faked.
Foil packet meals are a lifesaver, especially if you’re camping with picky eaters or kids. You can toss chicken, veggies, potatoes, whatever you’ve got, into individual foil bundles. Here’s a tip: add a splash of olive oil and your favorite spices, then tuck the packets into the coals. There’s more inspiration in this handy guide if you want to mix things up.
If you’ve only ever made classic s’mores, you’re missing out. Try swapping the chocolate bar for peanut butter cups or cookies and cream squares. Sometimes we even add sliced bananas or strawberries. It’s messy, but nobody complains.
On chilly nights, nothing beats a pot of campfire chili. I love letting it simmer in a Dutch oven while we play cards or just hang out. The smell alone gets everyone excited for dinner.
And don’t sleep on cast iron cornbread. It’s easier than it sounds—just mix up the batter at home, pour it into a greased skillet, and bake it right over the coals. The edges get perfectly crispy, and it’s the best side for chili or breakfast eggs.